I think this is just one of those tips that reminds us (me!) not to over think the problem.
My fiance was helping her friend who had some pictures of some costumes she made. The pictures were taken by placing the costumes on a cloth so they'd stand out and look nice. However, after she got the photos (as in 30 or more) in the computer, she decided the back drop looked too amateur and wanted to lift the costumes off the cloth.
We discussed the many ways you could go about this. You could use the stamp tool to remove the wrinkles; you could literally trace around the subject with the eraser; you could try to use the wand select + delete on the background (which works okay, but not great); and so on.
All these complex ways to remove the background... then my fiance tried the paint bucket. One click and the background was a solid, uniform color. Yup. "Keep it simple, stupid," wins again. :)
So here's where we left off at the end of lesson 1. We have a couple self-contained screens that we can navigate between by clicking buttons.
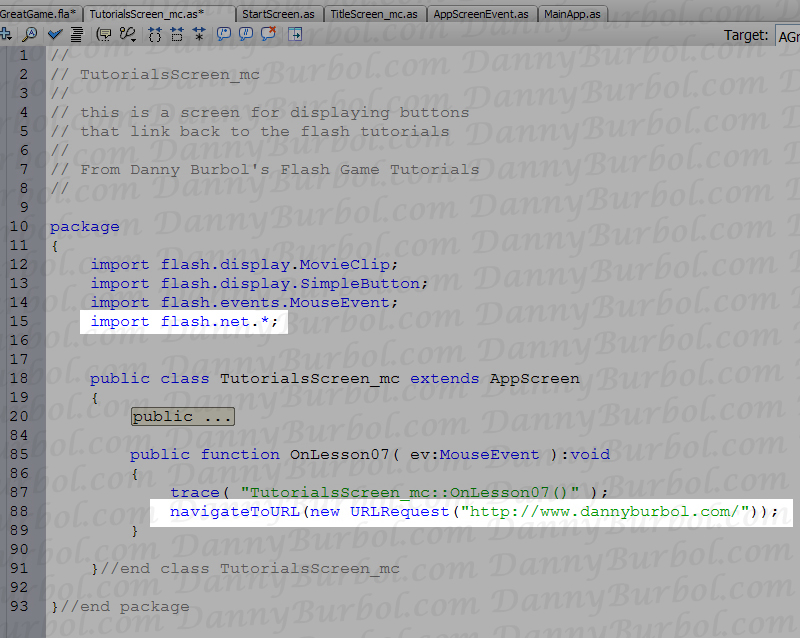
You'll notice that I changed my title text, scaled up the title screen buttons with the free transform tool (Tool bar, the black cursor with the box, under the white cursor and above the Lasso) and I've added an extra screen with links to these tutorials. You should be able to make changes like this if you went through lesson 1. The only thing you'll needs is the function to call to open a web link in a new window. Here it is:
Note the: import flash.net.*;
In this lesson we are going to:
Learn how to draw a sprite with a rectangle using ActionScript .
Learn how to create our main loop callback event (timer events).
Learn how to use Sprites for containers.
Learn how to use 2 dimensional arrays as an adjacency matrix (the game's board).
Learn how to detect simple keyboard keys presses.
Learn how to rotate our game's pieces using some simple vector math trick.
I'm also not going to be going in to as much depth as I did in Lesson 1. Lesson 1 was a "starting from nothing" introduction to flash, but here in Lesson 2, we're going to build on what we've learned rather than reiterate all of it. So don't be afraid to pop open Lesson 1 and review a couple steps when you feel the need. I know it's annoying, but realizing you don't quite know how to do something and having to go dig up the info is actually a great way to train yourself to remember.
1. How To Draw a Rectangle With ActionScript
Flash uses vector art, which basically mean it holds most of it's visual data as math. For example, if you wanted to draw a smiley face in flash, you'd draw a yellow circle, then on top of that you'd draw two smaller black circles (for eyes), and a maybe a half circle for a mouth.
Flash doesn't keep that final image of the smiley face anywhere. Instead, it keeps the list of shapes it needs to draw in order to construct the smiley face every time we want to draw it combine with some information on where to draw these shapes, how big to draw them, and/or at what angle to draw them.
This is what Sprites are for. Sprites are basically just a list of shapes combine with a position, rotation, and scale for drawing those shapes. You can also think of Sprites like a container full of child objects/shapes. If you move the container, everything inside it moves too.
So basically, we're going to create a Sprite. Then we are going to add a bunch of shapes to that sprite. Finally, we are going to tell flash that we want that sprite to be drawn on the screen.
In order to make this example as simple and bare-bones as possible, I'm just going to make a little test function and drop it into your MainApp's constructor.
Notice that we don't have to add the import command for the Sprite because we already have it. MainApp was extended from Sprite. So we just create a new sprite like we'd create any new object.
Next we make the color white by using the RGB hex value FFFFFF. (Do a web search on "HTML colors" or "RGB colors" if you'd like a more in-depth explanation on why FFFFFF is white). Then we use a few graphics commands to add a shape to the sprite. We use beginFill to specify the color, drawRect to add a rectangle and endFill to say we're done. The values we passed to drawRect were the x and y positions (0 and 0) followed by the width and the height of the rectangle we want (20 and 20).
Finally we tell Flash we want to draw this sprite. We do this with addChild(). But why does this work? What are we actually doing here? Remember, sprites are like containers. If we have a sprite that is being drawn to the screen, we can add more children to that sprite and it will be drawn to the screen as well. MainApp is a Sprite. MainApp is already being drawn because it's our "Document class" (remember, "AGreatGame.fla" > "Properties" > "Document class: MainApp"). We've already hooked up MainApp to be drawn, so when we add children to MainApp, they get drawn too. This is because Flash works "display lists". When MainApp is told to draw, it tells all it's children to draw and they in turn tell their children to draw, etc.
So addChild() adds our sprTestBlock to MainApp which is a sprite that's already being drawn. After that we just set the test block's position to (20, 20).
Don't forget to call DrawATestBlock(); in your constructor, then save your files and test the movie.
Note, I made my block white because my background was black. I trust if you've made it to lesson 2 you'd be wise enough to make the block a color that will stand out against your IntroScreen's background.
Also note, the block is in the top left corner of the screen and offset to the right and downward by 20 pixels. That how screens work. The origin is in the top left corner of the screen. Positive x is to the right. Positive y is down.
So we drew a square and we did it by breaking our nice self-contained AppScreen framework. I only did this because I wanted to make sure you saw all three steps for drawing a block before we separate them.
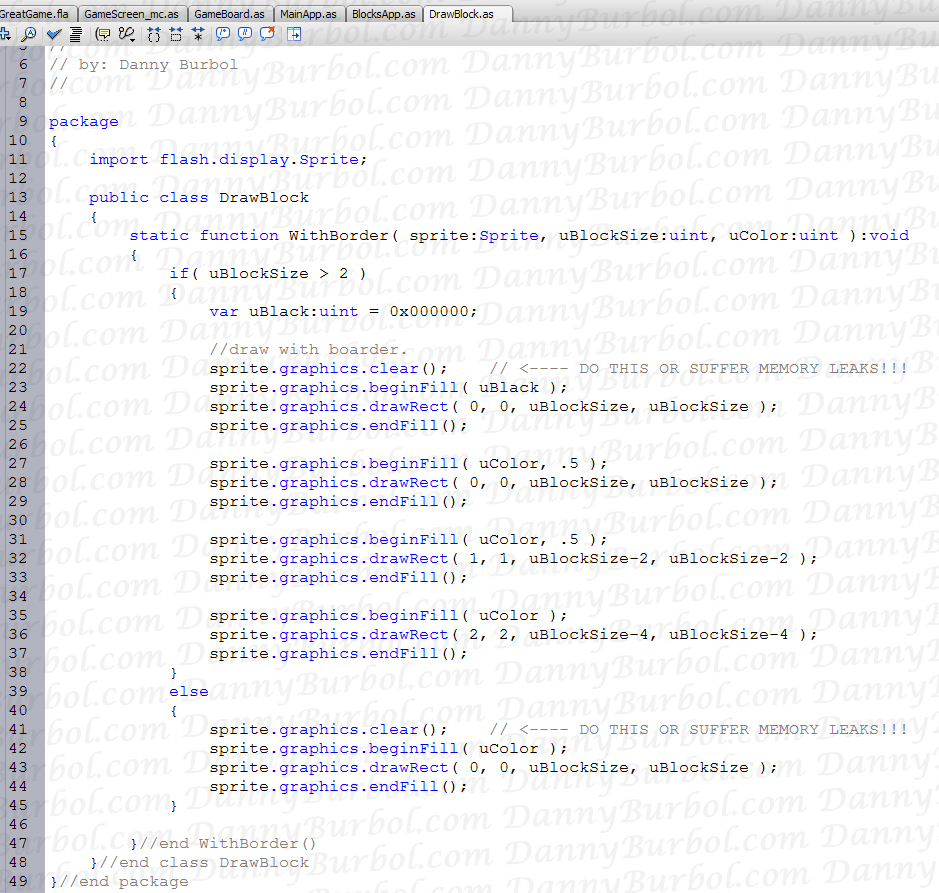
Let's start by making a function for drawing a block to any sprite in any color. I'm going to do this by making a small DrawBlock class with a static function member.
Create a new *.as file. Save it as "DrawBlock.as" and type this into it:
(My header comment got clipped a little bit, but it's something to the affect of: "// a class to hold drawing functions.")
We do our standard "package" wrapper, followed by importing any api's we are going to use, then we make our DrawBlock class. The only function is a "static" function, which means we will be able to call "WithBorder()" without having to create a "DrawBlock" variable first.
//so instead of:
var tmpDrawBlock:DrawBlock = new DrawBlock();
tmpDrawBlock.WithBorder();
//the static function lets us do it like this:
DrawBlock.WithBorder();
In WithBorder we're drawing more than one square now. We draw a black square. Then we draw a specific color right on top of it. The .5 in beginFill means we're drawing at 50% alpha. So we're drawing a semi-transparent color on top of a black square... which gives us a dark colored square. Then we inset the size of the square and do it again, giving us another shade of the intended color. Finally we inset the size of the square one more time and draw the color we were instructed to use. It's all wrapped in a test for uBlockSize just in case someone calls it with a uBlockSize that will cause us trouble.
Now I want to bring your attention to the clear() function with my all-caps comment. Say you had a sprite, and you called DrawBlock.WithBorder() on it. It's going to add 4 rectangles to the sprite's list of things it should be drawing. If you don't clear() the list of shapes before adding more, then those 4 rectangles will just keep getting added to the end of the list. It will look fine on screen, but before long you could be drawing a list of hundreds of shapes each time Flash draws your sprite to the screen. It may sound trivial, but if you don't call clear() you could very easily find your game grinding to a halt the longer you play it.
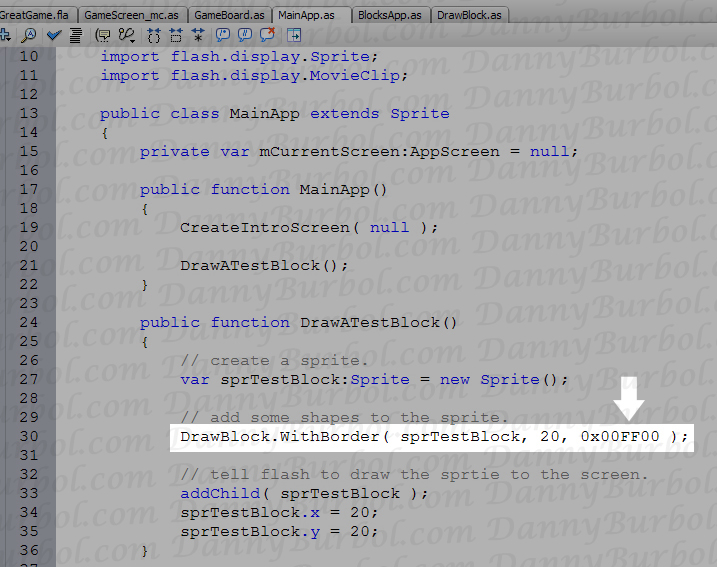
Okay, now lets go back to MainApp.as and update our test function:
Notice that I switch the color to green so you can actually see what our DrawBlock.WithBorder() function does.
Save your files and test the movie.
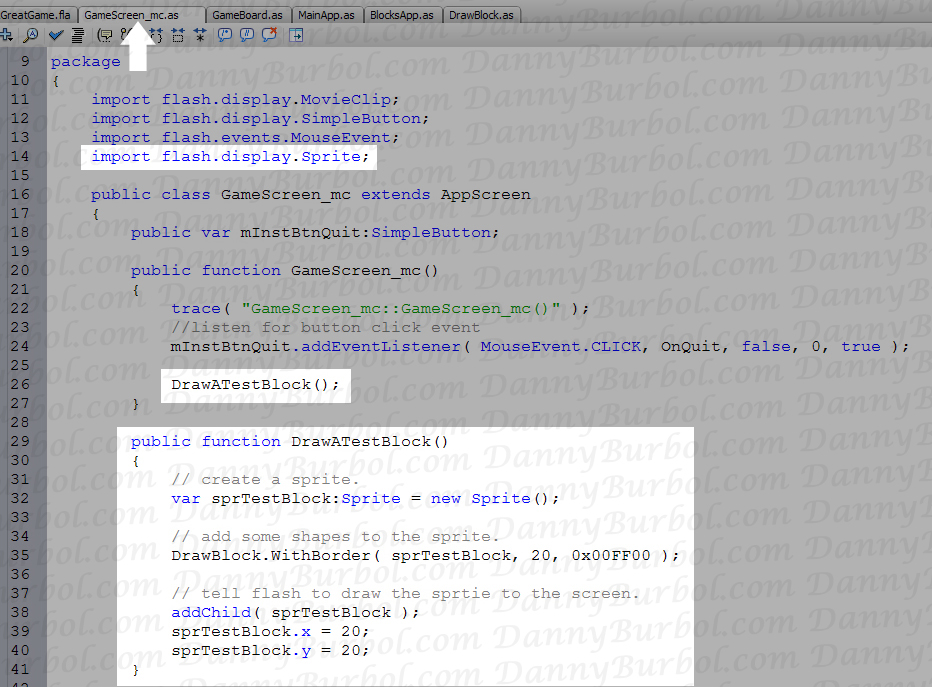
Next, let's add the block to the right screen in the game, the GameScreen. Pull the "DrawATestBlock();" out of MainApp's constructor and put it in GameScreen_mc's constructor. Also, move the DrawATestBlock() function to the GameScreen_mc class as well. Also, don't forget to add the import for the Sprite.
Now you should have this:
Note: remember, the block draws because our GameScreen is added as a child of MainApp in MainApp's CreateGameScreen() function. So the test sprite is a child of GameScreen which is a child of MainApp.
2. Laying out some game framework
Before we move to drawing game objects, let's start setting up a framework for our game to operate in. We'll start by addressing these hard-coded numbers in DrawATestBlock().
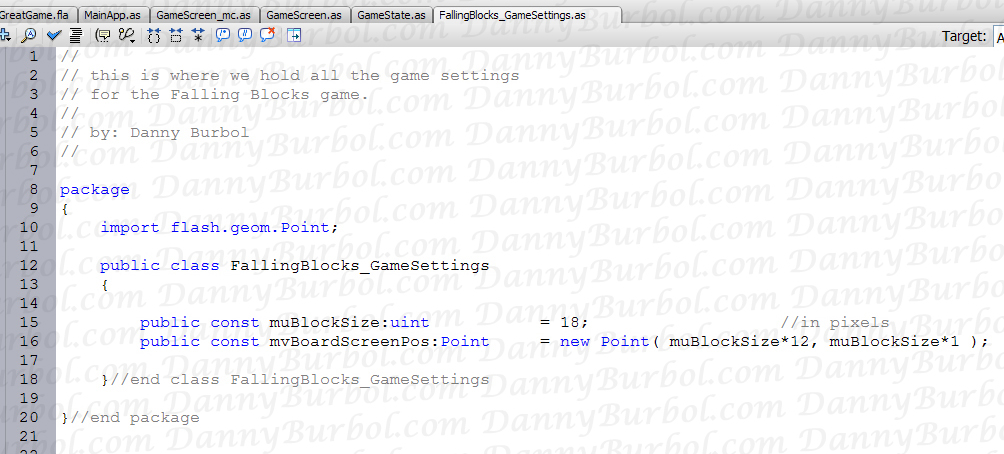
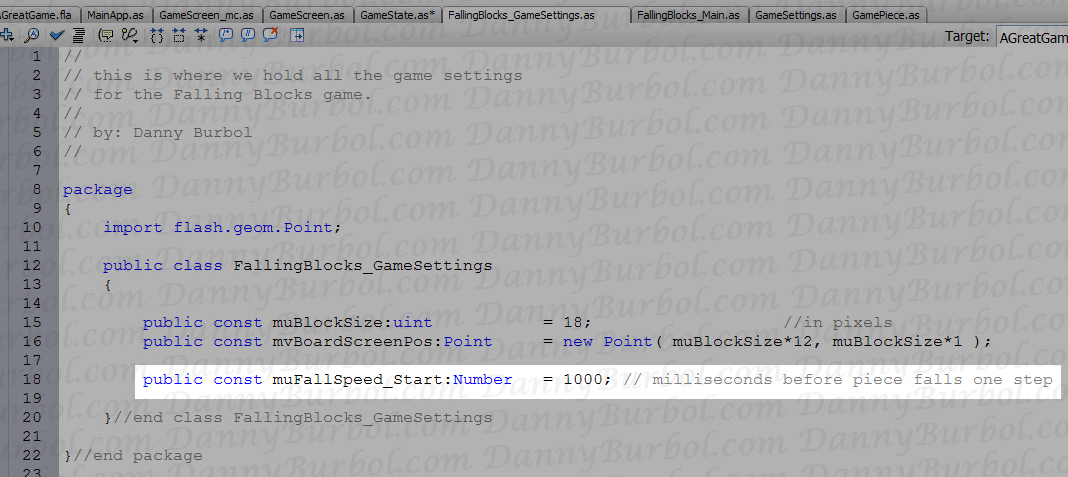
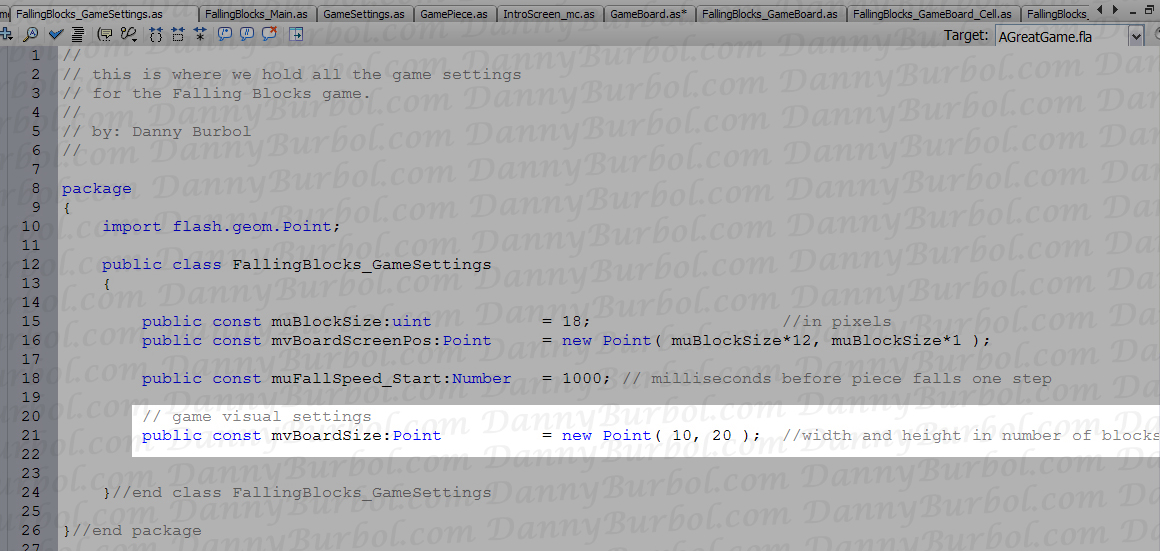
We're going to do this by making a class in a separate file that has nothing but const member variables. So create a new file and call it: FallingBlocks_GameSettings.as
You can see that I've done three new things. I've imported Point. I've changed our block size from 20 to 18, and I'm calling our position mvBoardScreenPos and I'm moved it to the middle of the screen.
As the name implies, these will only be the settings for the Falling Blocks Game we're going to make. We won't be cluttering it up with constant variables that are needed on other screen or in other games. Also, the game settings will be completely separate from the game's logic. Later, when we create the game's main class, we will be passing it our FallingBlocks_GameSettings object.
Why do this? Why not just have a bunch of constant variable members at the top of our game's main class? Well, first of all, it makes it really, really easy to locate and modify the game's settings since they're not mixed in with other game variables. Second, if we design the game's main class to run off settings that we hand it, that means we can hand it different settings very easily. We could extend FallingBlocks_GameSettings with a class like FallingBlocks_GameSettings_DirectorsCut or FallingBlocks_GameSettings_ForTheMacOS. (note, when doing that, you'd need to change the 'const' to 'var' for any variables you want to override in the new class.)
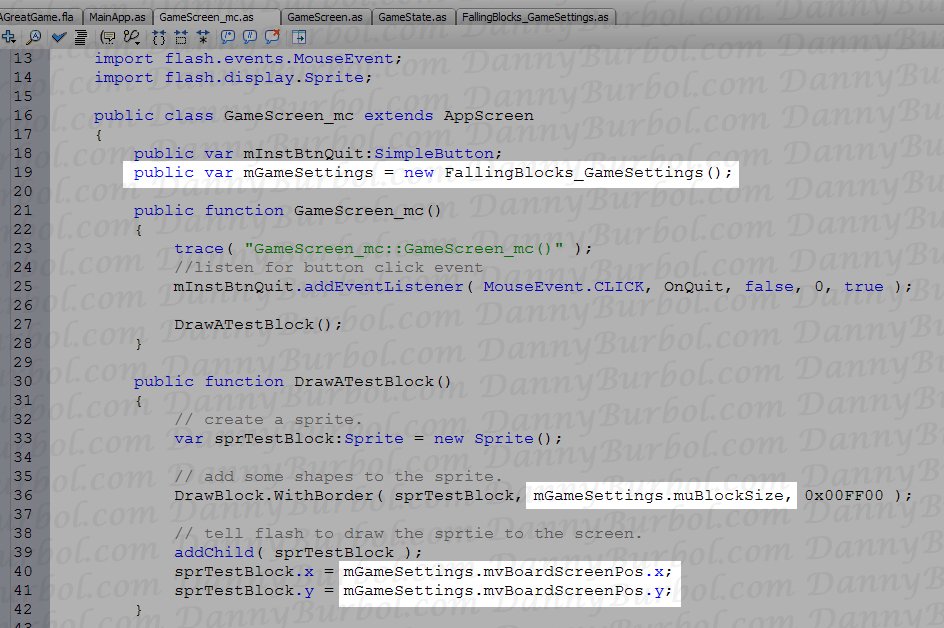
Make sure to hook up these game setting inside the GameScreen_mc class.
Save your files and test your movie. You should have this:
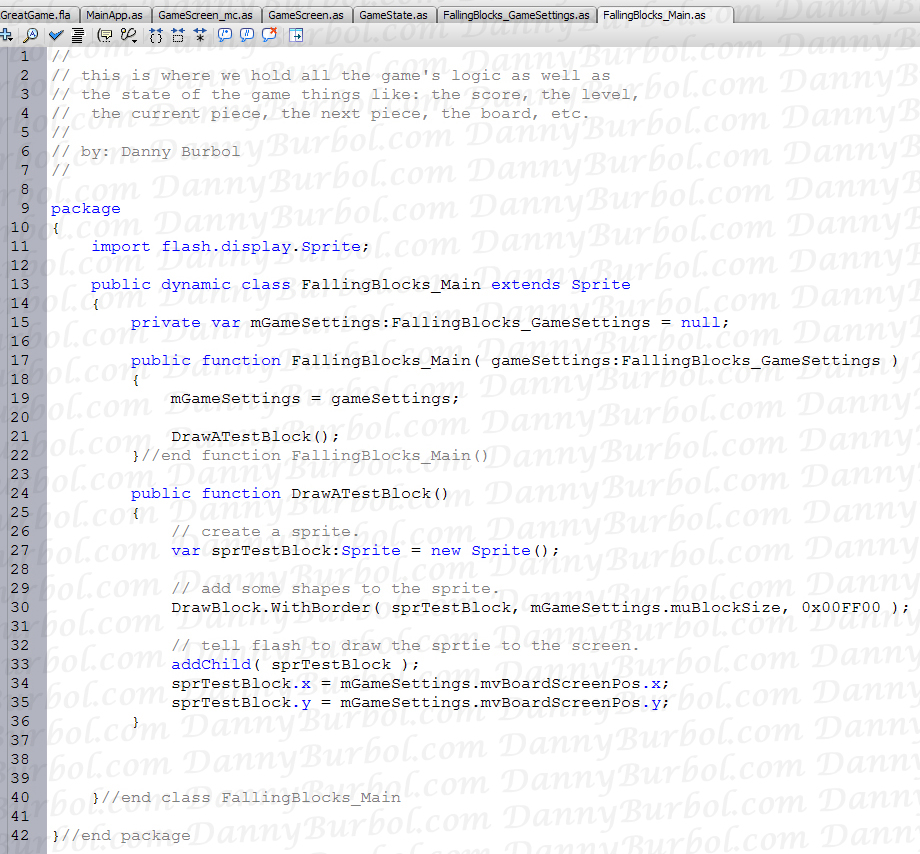
Now let's make the game's main class. We'll call it: FallingBlocks_Main.as
Again you see we've extended from Sprite. I did this because I wanted to take advantage of Sprite's container-like qualities as well as the fact that it's a display object.
You see we have a pointer to the game settings, but we don't create a new FallingBlocks_GameSettings ourselves, we use the one that's passed to us in the constructor.
I also moved our DrawATestBlock() from GameScreen_mc to here. Note that "addChild()" still works because FallingBlocks_Main extends Sprite.
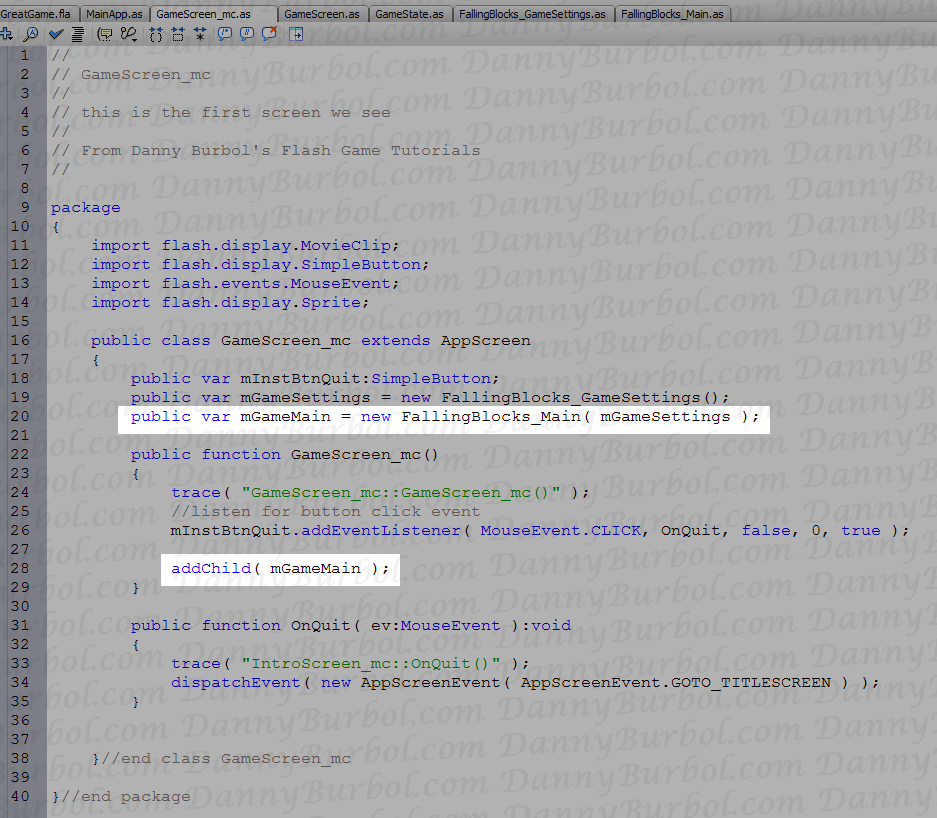
Now go back and update GameScreen_mc:
We create the new FallingBlocks_Main and used the settings we created on the line before it. We also call addChild( mGameMain ); If you don't do this, you won't see our test block being drawn. Also Note, the DrawATestBlock() function has been deleted and relocated.
Save your files and test your movie. It should look exactly the same as last time. Same result, better structure.
3. Creating a Main Loop with a Timer Event
Now let's hookup and test our main loop. If you're used to main loops, you'll notice that this one is slightly different. Normally a main loop is called once per frame at 60 frames per second (well, we shoot for 60 frames per second). However, when working in console and pc games, we do everything ourselves. We do all the drawing, we handle all the input, we decide what happens in the game on *every* frame.
Flash handles most of that for us. Plus, it uses events to handle input, so we don't ever have to poll it ourselves every frame. So, in our falling blocks game, all we're ever going to do is react to player input events and make the player's current piece fall. Since input is handled with events, all our main loop will ever do is sit around waiting for enough time to go by so we can make the game piece fall down.
Rather than spend all those cycles in a main loop that just waits on a timer, we're going to do the opposite. We're going to set a timer event that will get called each time the game piece is supposed to fall a row. As the game gets harder, and the game piece needs to fall faster, we'll just updated that timer to be a little faster. So basically, this game doesn't need a main loop that gets called every frame, we just need a timer event to drop the block every second or so.
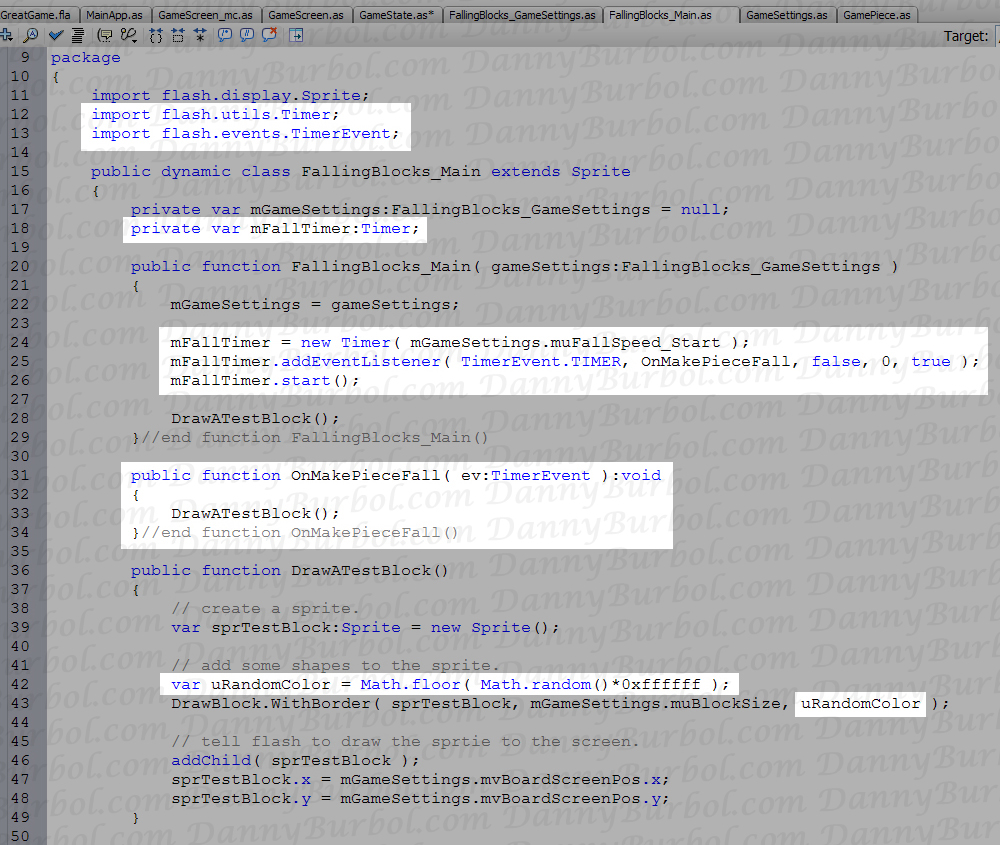
Here's how we create a timer event in our FallingBlocks_Main.as
So we import our Timer and TimerEvent, then we create a new member variable that is a timer. In our constructor we create the timer and set how much time it takes before it calls the callback (you'll see in a moment, muFallSpeed_Start is set to 1 second).
After that we addEventListener so we can call our callback function OnMakePieceFall when the timer goes off. Then we start the timer.
Next you'll see our OnMakePieceFall function needs to have a parameter of type TimerEvent. This makes sense because addEventListener was using a TimerEvent.TIMER. Finally, just for testing purposes, I dropped the DrawATestBlock() function in there.
NOTE: take a good look at DrawATestBlock(). Every time it's called we create a new Sprite and attach it to the FallingBlocks_Main object. This is a prime example of a memory leak. So don't leave your program running over night in this state because it will eat up memory. Remember, DrawATestBlock() is for testing purposes, not final game purposes.
I've also changed DrawATestBlock to use a random color each time it's called.
Now jump over to the FallingBlocks_GameSettings file and add in the muFallSpeed_Start.
Again, 1000 milliseconds is 1 second.
Save your files and test your movie. You should have a block that changes color once a second.
Bonus use for timer: delay
While we're on timers, let's go make our intro screen time-out if we don't press the skip button soon enough. Why don't you go give it a shot and then come back to check your work?
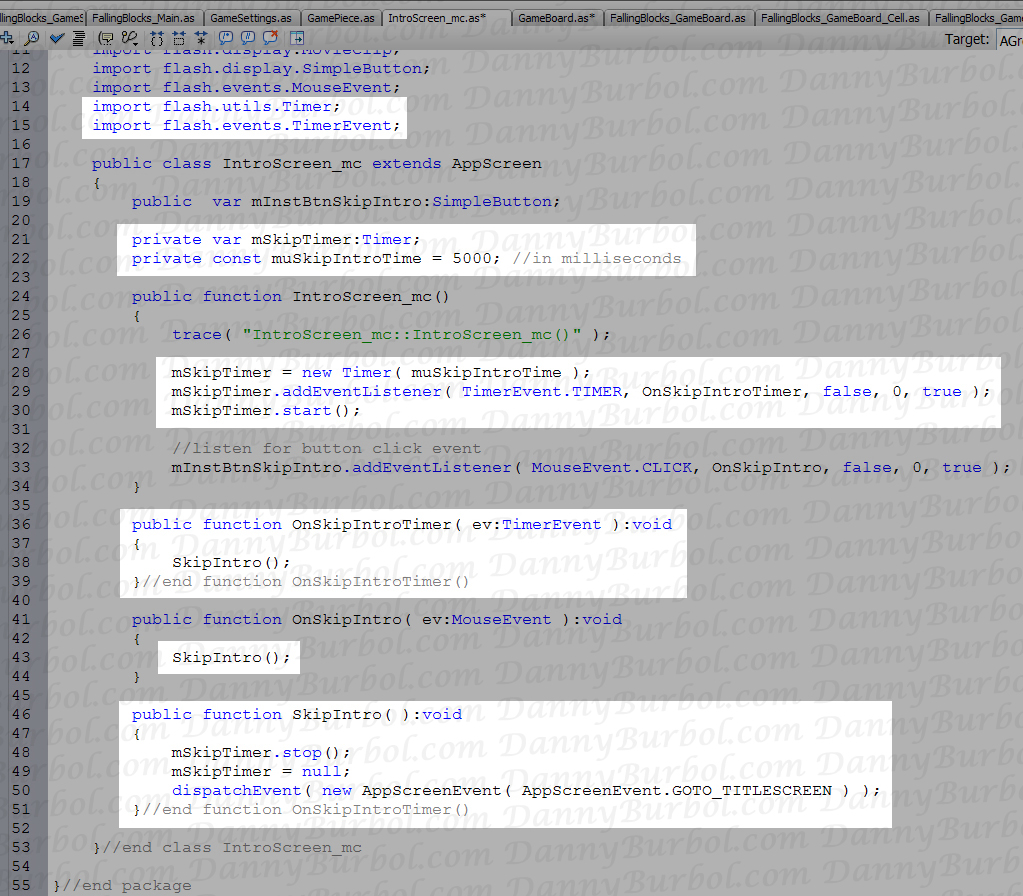
Okay, so here's what I did in IntroScreen_mc.as:
So again, we import our Timer and TimerEvents, create a timer member variable and a const to control the timer's delay. Then we create it and hook it up in our constructor.
In our callback, we do what the skip button would have done, so I've reloaded that dispatchEvent into a SkipIntro() function that both event callbacks will call. Now we change SkipIntro() and both the timer event and the button clicked event will stay in sync.
However, did you notice that you have to stop the timer yourself otherwise it will keep going off and bringing you to the TitleScreen. It seems buggy to me that flash would continue to call a callback in a member function from an object that's been put on the garbage collection list, but the thing about garbage collection is that it's not instant, so it's better to just play it safe, just in this case.
(You will probably have to refresh the page to see the following swf actually move from the intro to the title screen.)
Also Note: right about now you're going to want to go back to your MainApp constructor and comment out the CreateIntroScreen() and replace it with CreateGameScreen(), so you don't have to click through to the game screen each time you test your movie. When the game is all finished, we can turn the other screens back on. This is totally optional, but makes debugging faster.
4. Making the Game's Board
Before we go on, let me just be clear on some of my terminology, so we're all on the same page.
Block: is a colored square in the game board or in a game piece.
GamePiece: is made up of 4 blocks, this is what the player is in control of as it's falling.
GameBoard: is a grid that represents the area the game is played on.
GameBoardCell: is one cell of the gameboard's grid. It's more than just a block. A cell holds information about the block that may or may not be in this grid cell.
With those terms cleared up, let's talk about how to use a 2 dimensional array to represent the game's board.
If You don't Know What an Array is, read this:
I'd describe an array as "a bunch of something in a row." If you're a Star Trek fan, you may recall the captain saying "fire the forward array," to say "fire all the cannons across the front of the ship."
In a computer programming language an array is a bunch of numbers that are lined up in a row. The syntax often uses "[" and "]". So something like "myPhotos[0]" would get the first element in the array of myPhotos, while "myPhotos[1]" would get the second element in the array of myPhotos.
Arrays are handy, if you don't know much about them, please do a web search on them because they are pretty basic programmer knowledge and they are pretty crucial to know how to make and use.
If You don't know what a 2d array is, read this:
This is basically an array of arrays. So if we had an array called "columns" which had 10 elements (i.e., 10 columns). Each of these columns might also hold an array (i.e. an array of cells, one for each row in the column). So for example, grid[4] would be the 5th column in our grid. What's in the 5th column? An array of cells. gird[4][1] would get us the grid cell from the 5th column, and the 2nd row.
Again, multi-dimensional arrays are handy and if you don't know much about them, please do a web search on them because they are also pretty crucial programmer knowledge.
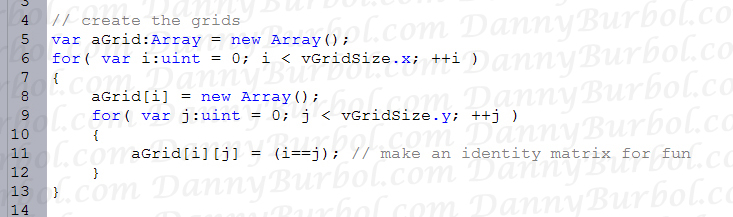
Okay, if you're here, you know what 2d arrays are, so here's what they look like in ActionScript3 syntax. (you don't have to type this anywhere, just observe and take it in.)
Basically, we're going to make the FallingBlocks_GameBoard nothing more than a grid. To keep things easy to read and work with, we're going to make each cell in the grid an object called FallingBlocks_GameBoard_Cell
So the GameBoard only holds a bunch of cells, and each cell will hold it's own data, things like, "is there a block here or not?" "what color is it?" "is it special?"
Let's start by defining some more constants. Most falling blocks games use a grid that's 10 wide by 20 tall. So we're just going to stick with that.
Update your FallingBlocks_GameSettings.as:
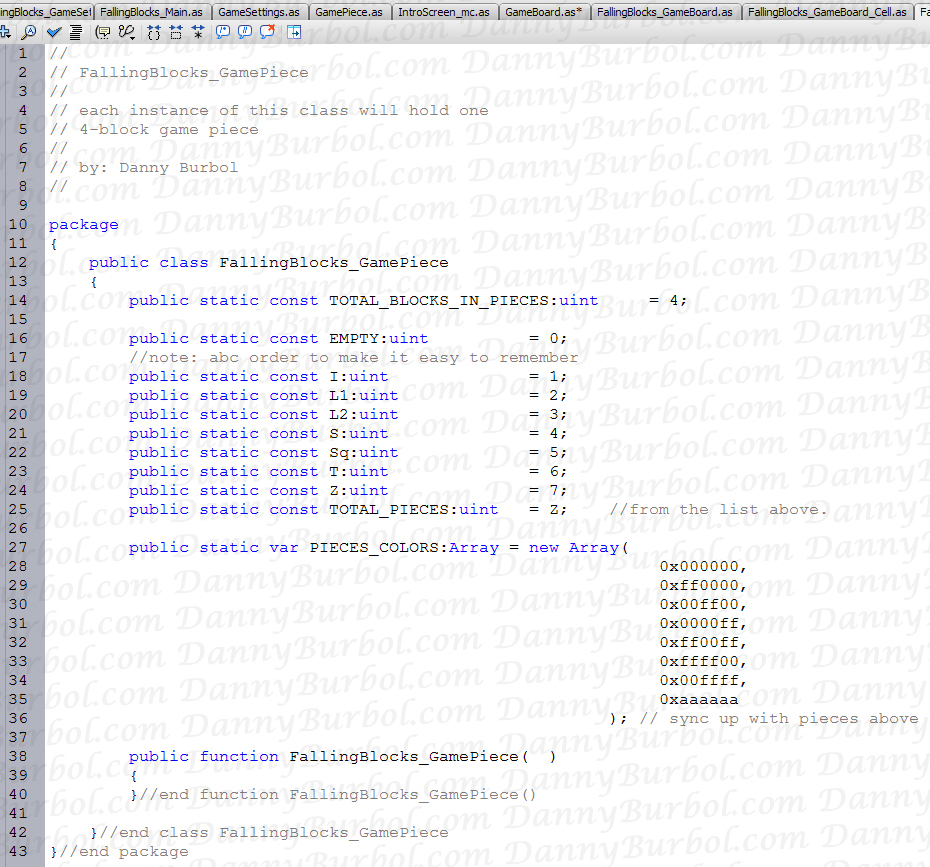
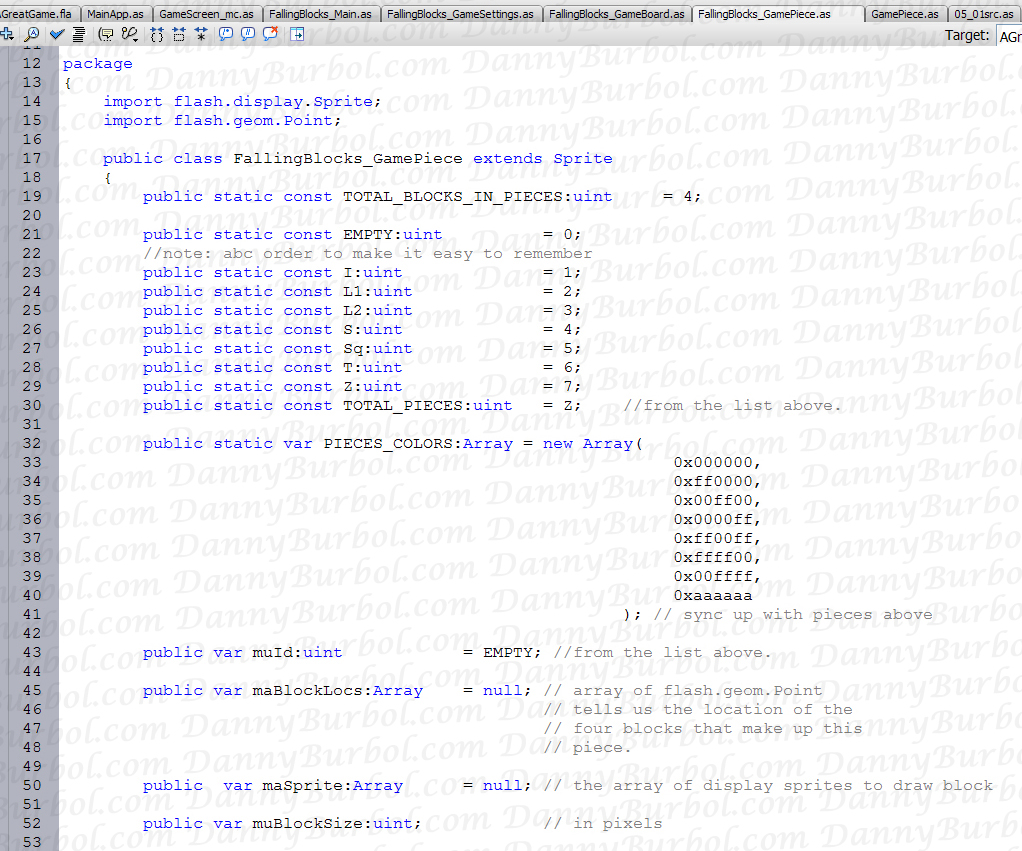
Next, I'm going to setup a mostly blank FallingBlocks_GamePiece class simply because I want to define the colors and ids for the pieces that the GameBoard_Cells are going to be using.
Create a FallingBlocks_GamePiece.as:
We used "static const" so we could access these variables without needing an instance of the class. Also note, the colors are not const because we're going to make the colors change after each level.
Create a FallingBlocks_GameBoard_Cell.as:
So again we have some static consts to keep track of the cell's states for "IS_EMPTY" and "IS_FULL".
We have a sprite, which will where we do our DrawBlock.WithBorder().
We have a BlockId, which refers to the gamepiece who's block is in this cell. We keep this id rather than a color because we can always lookup the color of the block as long as we know which game piece we're part of. This way, when colors of game pieces change, the cell can easily look-up and update to the new color.
When we create the cell, it automatically creates a sprite and set's is position. Keep in mind this position is in pixels and is measured in relation to the GameBoard's origin.
Finally, we make some IsEmpty() and IsFull() functions to make our lives easier later.
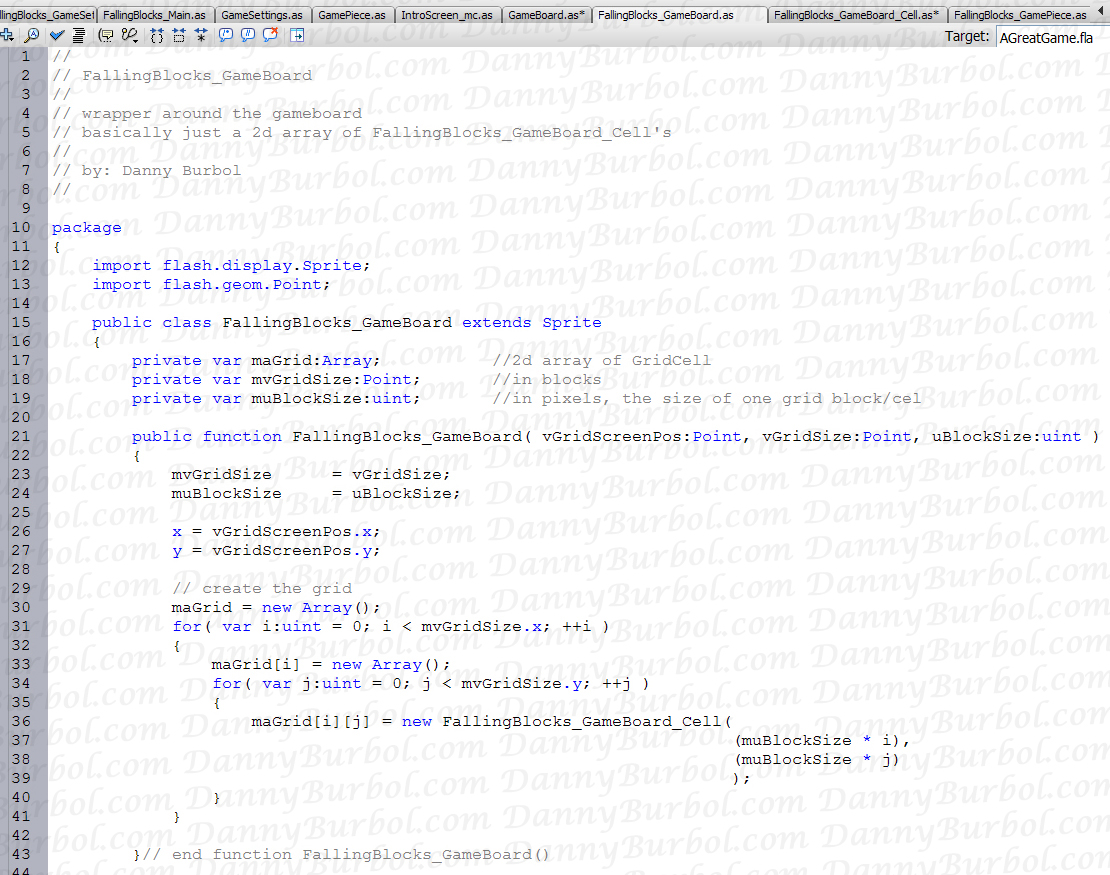
Now create a FallingBlocks_GameBoard.as... we'll do this file in two pieces so I can explain as we go:
Again we import Sprit and Point.
The class extends Sprite because we want to treat our game board like a sprite. It will be drawn, it will have a screen position and it will contain children.
We have 3 member variables, the Grid is the most important of the data. The GridSize and the BlockSize are just cached values we'll be getting from FallingBlocks_GameSettings, which are passed to use in the constructor.
The constructor saves the settings we just mentioned and then set's the position of the sprite we extended. After that we create our 2d array for the gird. Notice how we create a FallingBlocks_GameBoard_Cell for each slot in the grid and we give it the pixel offsets from the board's origin.
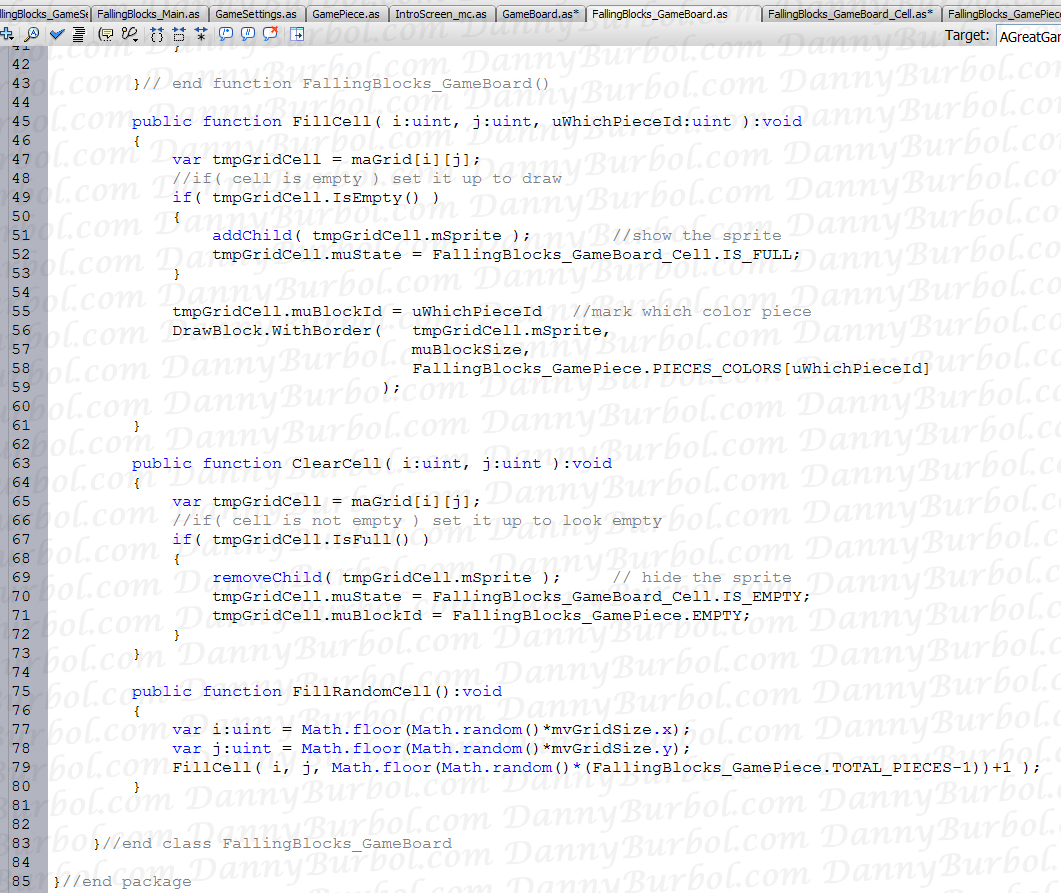
Now let's look at the second half of FallingBlocks_GameBoard.as:
Here are some basic functions that we will be using with our GameBoard, a FillCell(), a ClearCell(), and a debug function to FillRandomCell().
FillCell() takes an offset in the grid, and the id of which piece we want to fill it with. The first thing we do is check if the cell is empty. If so, we need to add it to the GameBoard as a child so it will draw. NOTE: if you call addChild when the child already exists, Flash will be unhappy with you. This is why we check first rather than just blindly call addChild. After all that, we set the Game Piece id to use and Draw that block into our cell's sprite. Note: how we looked up the color in the PIECES_COLORS array.
Clearing a cell is as simple as not drawing it and clearing out it's IS_FULL state. This is the first time we've used removeChild(), but it's just the opposite of addChild(). If the sprite is no longer a child, it will no longer be drawn.
Finally, FillRandomCell() gets a random index in the grid and fills the cell with a random piece. The "-1))+1" on the random piece is because we don't want zero as one of the random values returned.
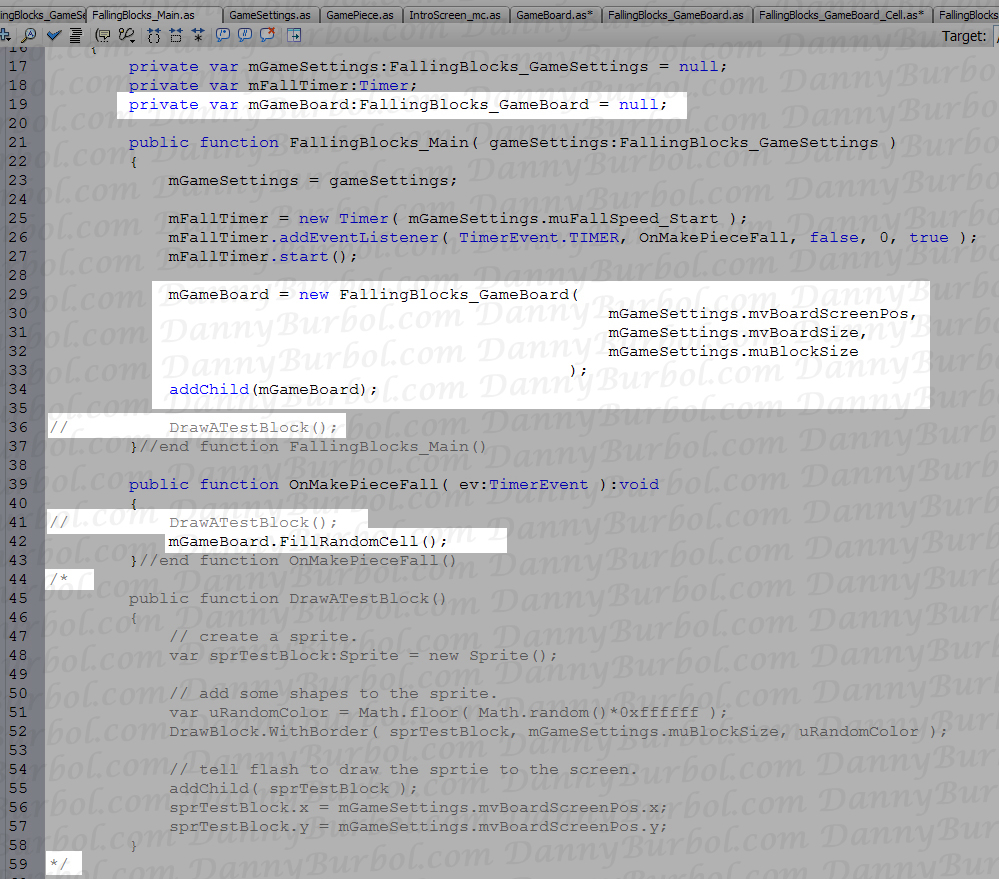
Okay, now let's hook it all up in FallingBlocks_Main.as
We add our mGameBoard class member variable, and then create a new one in the constructor. When creating it, we use all GameSettings data. After that we have to add the GameBoard (which extended Sprite) as a child of FallingBlocks_Main (which is also a Sprite), so the board will actually get displayed.
I commented out all references to DrawATestBlock() because we no longer need it. If you look, creating a new FallingBlocks_GameBoard() replaces the line where were created a Sprite in DrawATestBlock, and we also called addChild(), just like in DrawATestBlock.
Finally, to make sure the DrawBlock.WithBorder() still happens, we add mGameBoard.FillRandomCell() to our OnMakePieceFall() callback.
Save your files and test the movie. You should have a gameboard that randomly files with block of color, like this:
5. Setting up and Drawing Game Pieces
There is much to do in FallingBlocks_GamePiece.as, however much of it is repetitive. The GamePiece is much like the GameBoard, just an array of blocks that make up the various shapes.
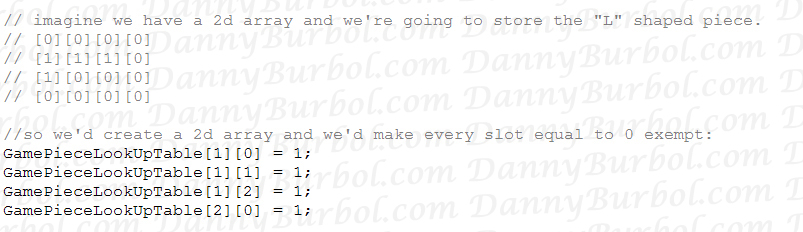
There's two ways we can go about this. We can make a 2d array that works like a little lookup table or adjacency matrix that tells us, one for one, what the block looks like, or we can make an array of 4 elements that hold the position of each block.
Let's compare. First, here's what a one for one look up table would look like:
But if we're only ever going to have 4 blocks in a piece, why make a 2d array that has a total of 16 slots?
This way, we don't have all those empty slots in a 2d array lying around doing nothing.
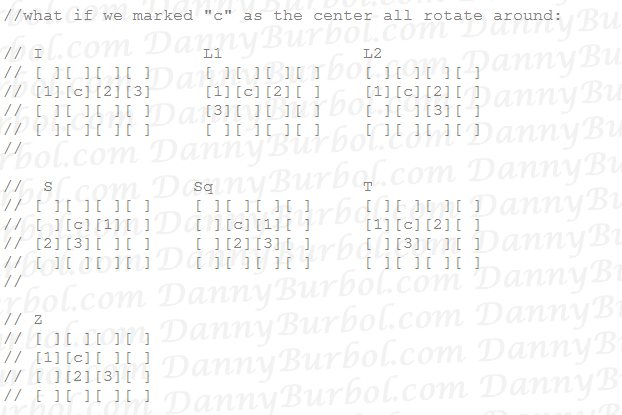
But how about we take it one step further? Let think about this. The piece is always going to have a "center" block that the piece rotates around. And since none of the pieces have an empty block that they rotate around, we can guarantee that there will always be one block that all of the pieces have in common.
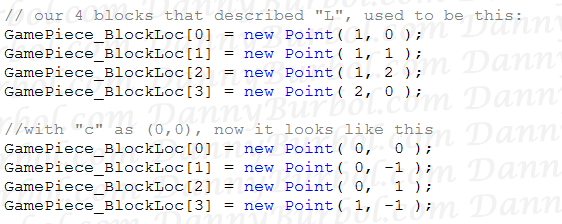
If you imaging all the pieces rotating around "c" in our look-up grids, you'll see that they all have this one block in common. So let's do everything in relation to that block. Let's say, "c" is at Point( 0, 0 ) instead of Point( 1, 1 ).
Now, we can probably write our FallingBlocks_GamePiece with an array of *3* block locations because the block at (0,0) never changes.
However, we're not going to do that. I know some people love to optimize every chance they get, but I like to keep things general and flexible and optimize at the end (rather than optimize ASAP and code myself into a corner)
Besides, I want you to be able to reuse this gamepiece code in other Falling Blocks style games that might have totally different shaped pieces. So let's keep it general and keep it an array for 4 block locations, but let's capitalize on knowing that they will have a center that they all revolve around. If we make the center block always sit in slot[0] of our array, we can optimize by skipping that slot when ever we can (in loops for all blocks in the game piece), and always fall back on NOT skipping it if we find the need for it. (trust me, all that crap about making "c" equal to Point(0,0) wasn't a waste of time, we'll use it later in this lesson.)
Okay, so we're going to start filling in FallingBlocks_GamePiece.as. All the stuff we've been talking about will be in the function InitBlocks(), but we're just going to start at the top of the class and work our way down a chunk at a time.
I imported Sprite and Point, and then made our game piece extend Sprite for the same reason we always do (display & container qualities)
I added some member variables for keeping track of our piece's id, the array of block locations, an array of block sprites, and the block size in pixels.
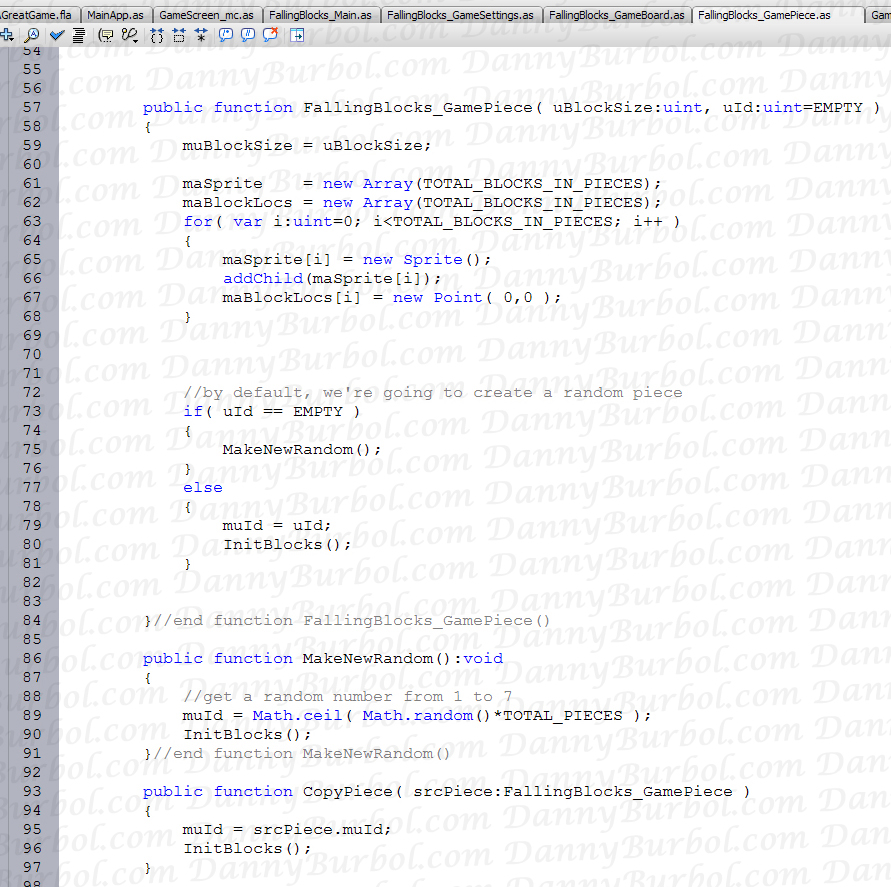
Notice our constructor defaults to "EMPTY" as a block type. We'll talk about that in a moment.
We create our array of 4 block locations and also an array of 4 sprites for displaying the blocks. Then we give them an int and add them to the FallingBlocks_GamePiece sprite.
Now we test what id was passed to us so we can either create the block, or create a random block if nothing was passed to us.
The MakeNewRandom function is pretty straight forward. We pick a random piece and then Init it.
CopyPiece is pretty much the same thing, only instead of picking a random piece, we use the id from another piece.
Okay, now here comes InitBlocks(), which carries out everything we talked about at the beginning of this section.
So I started with a comment that looks like what we talked about in the beginning. If there are any "elite" programmers out there who can't stand seeing diagrams in code, I'd just like to say "you're out numbered by the rest of us" :) . It's called "self-documenting code", get on board.
Okay, so as we've discussed, slot 0 in maBlockLocs is always 0 and 0. Notice that I didn't say: maBlockLocs[0] = new Point(0,0); I don't care what programming/scripting language you're using, it's usually not wise to create new objects when you don't really need to. As you can already see by the last couple functions, InitBlocks is going to get called more than once, so there's no reason to have it create 4 new Points every time it's called.
After we init out first slot, the rest of the blocks are init'ed selectively by which piece we're making. It's really not that complicated (especially with that handy diagram comment :)
I expect everyone will gloss over that "btw" comment about the game piece's screen position, but don't worry, I plan on making that visual.
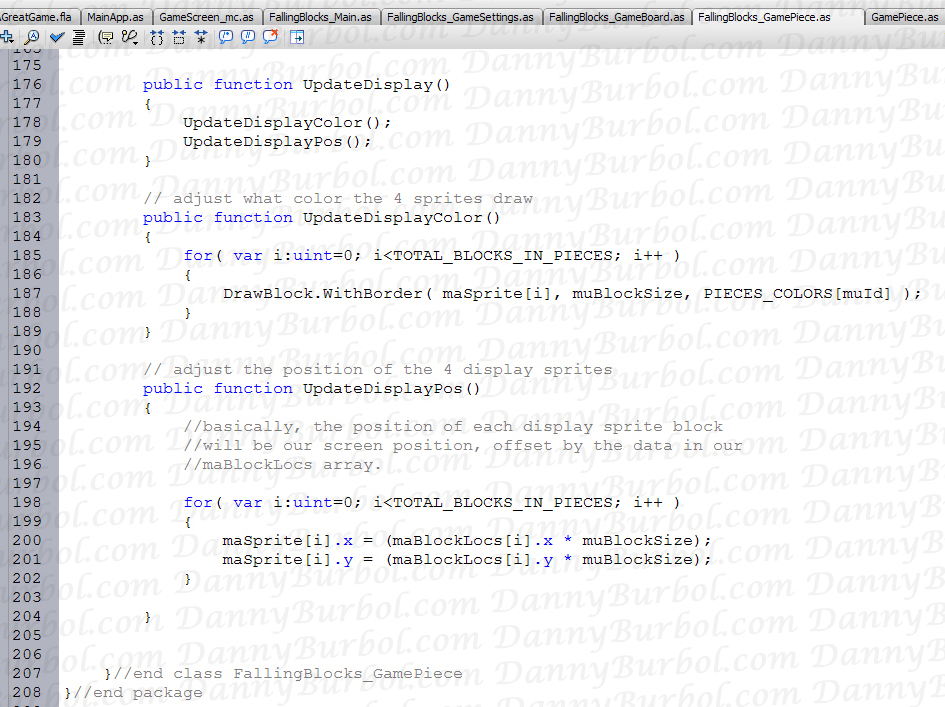
Finally, we call an UpdateDisplay() function. Basically, when the blocks change, we need to make sure the sprites that are being used for each block are updated to reflect the change. So let's look at those functions next:
Our UpdateDiplay() function does two things, updates the colors and the positions of the block sprites.
In UpdateDisplayColor() we just run through all our block sprites and Draw the correct color in the sprite.
In UpdateDisplayPos(), we set the position of the block sprites in relation to the GamePiece itself.
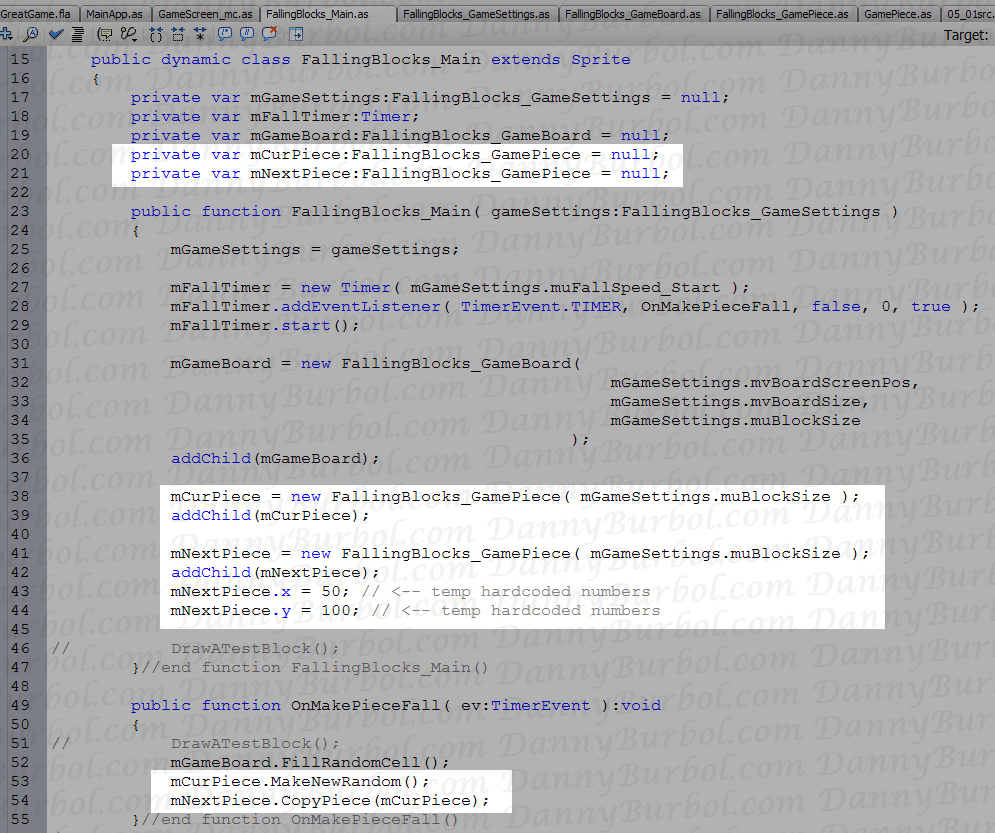
Okay, now all that's left to do is hook it up in FallingBlocks_Main.as and we're good to go.
Why create one FallingBlock_GamePiece when you can create 2, the current piece and the next piece. (I figured it'd be easier to just do them both at once)
We create out pieces in the constructor and we addChild() with them because, like always, we want these things to be seen.
I've given the next piece a dummy screen location, but I've left the current piece at (0,0) because I want to show you where (0,0) actually is.
Finally, down in our timed callback OnMakePieceFall(), we are going to create a new random piece and copy it to the current piece (yes, you may already have noticed those lines seem backwards as far as gameplay goes, but I'm trying to show you something).
Okay, save your files and test your movie and you should get this:
Notice how the current block sits up in the corner and is half cut off sometimes. This is what my "btw" comment in InitBlocks() was referring to. Since we made that center block the (0,0) block, then the screen position of 0,0 is the top left corner of that center block.
6. Getting Keyboard Input
Keyboard input in flash can be slightly tricky. You need to keep these things in mind:
Only the object that has "focus" will get keyboard input.
If you use actual letter keys in your game, when you test your movie, you'll have to got up to the "Control" menu and select "Disable Keyboard Shortcuts", otherwise your key presses won't seem to be firing correctly.
Windows has something called "Sticky Keys" that automatically enable themselves when you press the shift key 5 times. They are not fun. They will cause you to loose in the middle of a game. Stay away from using the Shift key in your games.
I've seen some cool keyboard input libraries floating around on line, however they are overkill for our game. Since this tutorial series started off as an introduction to flash, I'm going to implement keyboard input in a very basic, very simple way. (feel free to explore the web for the more complex options if you're interested.)
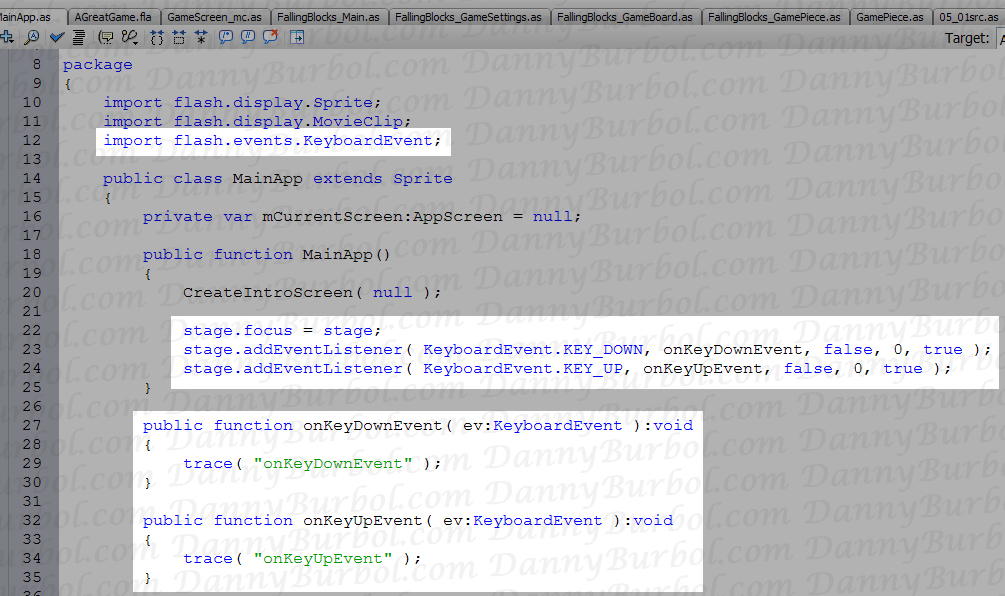
Okay, let's keep this section short and sweet. Here's the code for catching keyboard events. Open up MainApp.as and add this:
We're going to have KeyboardEvents so we have to import them first.
The "stage.focus = this;" is what I mentioned earlier. Regardless of how many objects are listening to keyboard events, only the object that has focus will actually hear those events when they are fired. It can be a little frustrating. You'll be pressing keys and wondering why the game is not working, only to find out the wrong object has focus. I'll show you more of that first hand in a second.
Next we add our keyboard event listeners. One for detecting key down and one for detecting key up. I've hooked them up to callback functions that just throw out some debug text.
Save your files and test your movie. (I'd show you an swf, but it's pointless because it's all in the debug print anyway.)
Notice that as you press some keys, you'll see the key down and key up print outs. Even when the game automatically movies from the intro screen to the title screen. Also notice that if you hold down a key, it will repeatedly fire the key down event.
Now, click the "Play" or "Credits" button (or maybe you clicked the "Skip" button and have already noticed). After you click a button, you stop getting keyboard events because clicking the button stole our focus. I understand the reason for Flash to work this way, but I wish it didn't. To get the focus back, you can just click somewhere on the game's screen and your input will start working again. But, do you expect the player to figure that out or go find another game to play?
Basically we have two options. We can give the focus back to the stage manually or we can hardwire it. This is why I attached the KEY_DOWN and KEY_UP event listeners to the "stage" and not the MainApp. The state is a keyword that's accessible from anywhere. So if you want to call "stage.focus = stage;" from any file at any time, you can. Thus we overcome this issue of loosing focus on a case by case basis.
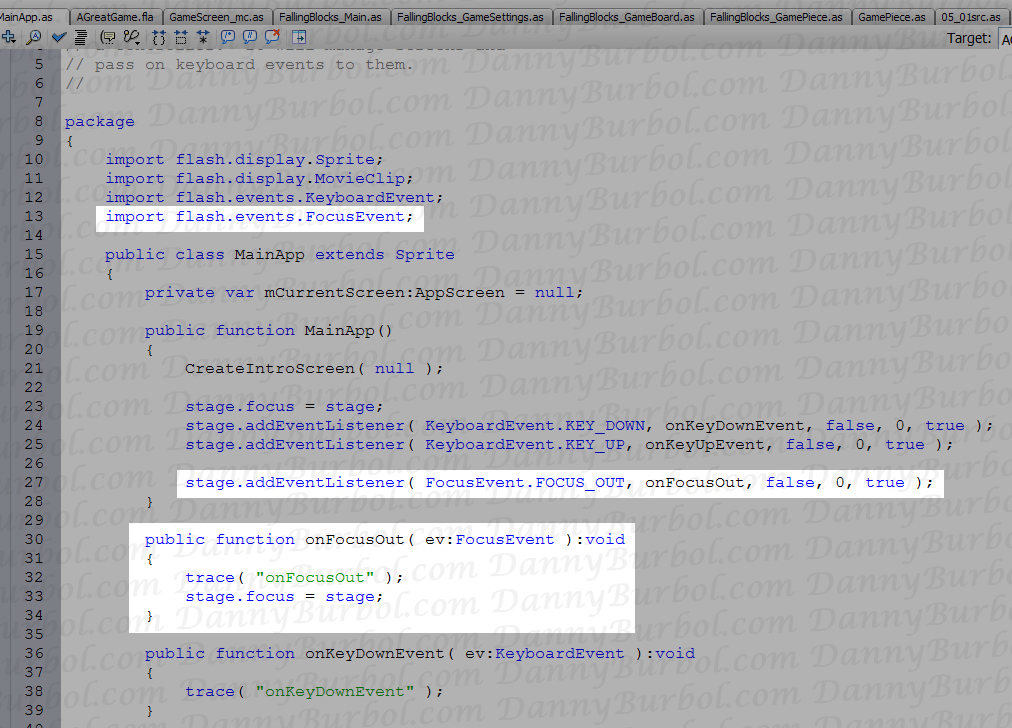
We can also hardwire it like this:
Now every time the stage gets a "FOCUS_OUT" event, it just sets focus back to itself.
BE CAREFUL WITH THIS. It may seem nice now but it can bite you later. For example, does your game have any text boxes for type names or messages in to? If so, you may be rendering them all useless.
Now, let's get that input to our game screen. I'm going to do this via overriding functions in the class AppScreen. It's very simple. Open up AppScreen.as. Notice how the class is empty. Remember the whole point of this class was so we can easily add functionality to all classes that extend it (as in, all of our screens). We're going to drop in the ActionScript equivalent of what C++ calls "a virtual function."
Basically when the callbacks in main app catch a keyboard event, they are simply going to pass it on to the current screen. There will be a stubbed out function in AppScreen for onKeyDownEvent and onKeyUpEvent that will do nothing.
Then any screen that inherits from AppScreen will have the option of overriding these two functions to actually do something. So TitleScreen_mc can ignore keyboard events, while GameScreen_mc can use them.
Here we go, starting with AppScreen.as:
We've imported our KeyboardEvent and we've created two callbacks, but no event listeners.
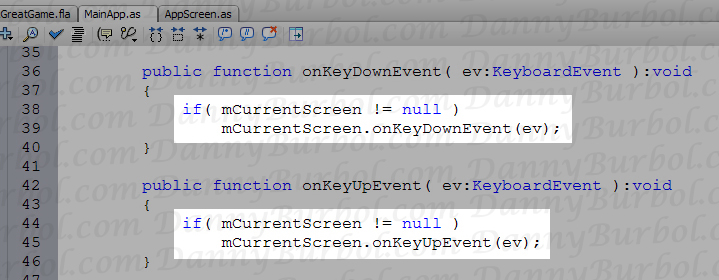
Now in MainApp.as
We update our event callback to pass the event on to the current screen.
Save your files and test your movie and you should now get the print outs from AppScreen.
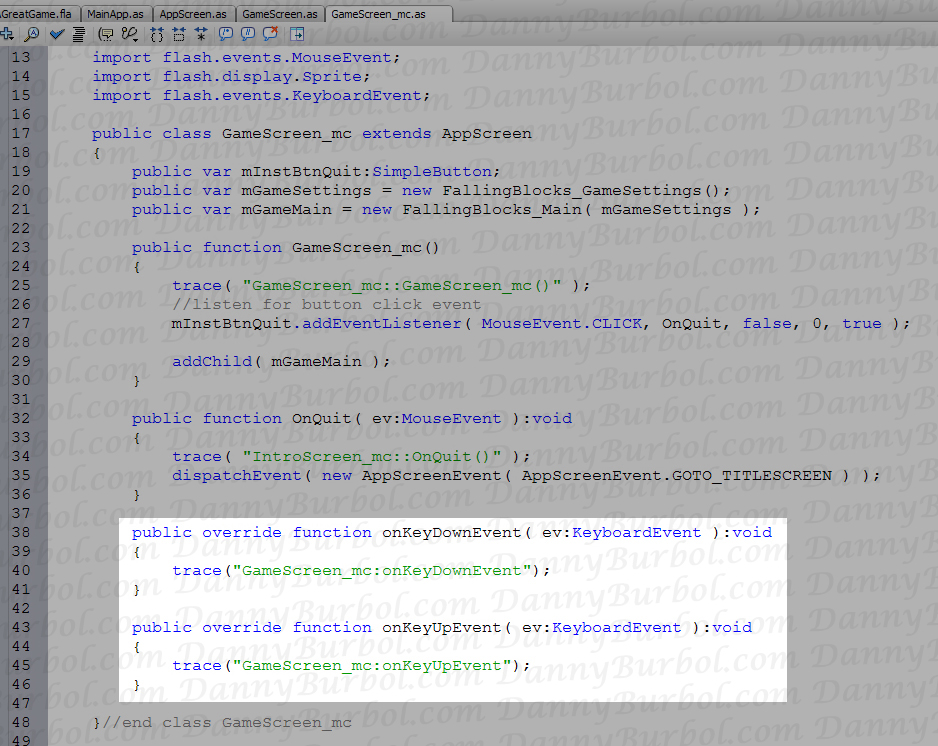
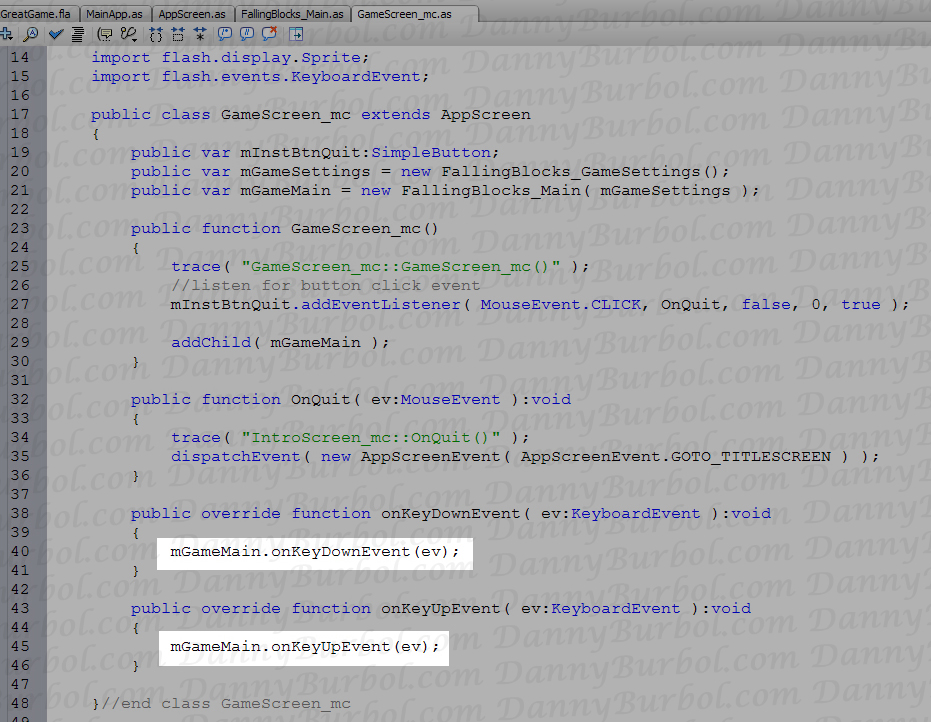
Next we go to GameScreen_mc and override the key event functions using the override keyword, like this:
Save your files and test the movie. Now you'll get that annoyingly long printout from AppScreen on every screen but the Game Screen, which will give us the GameScreen_mc's trace text.
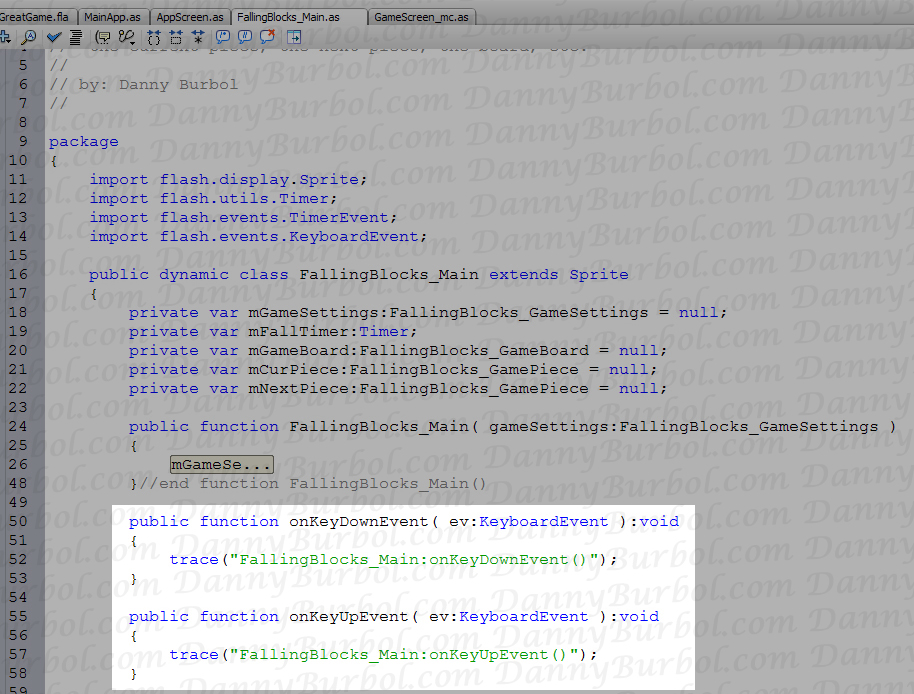
Next, let's take it one last step and pass the event onto your FallingBlocks_Main class.
FallingBlocks_Main.as:
Again, we import our KeyboardEvents, we create two functions for key up and key down, and then we drop a trace in there. (Note, if you copy and pasted those functions from the previous file, make sure you delete the "override" keyword).
Now go back to GameScreen_mc.as and pass along the events:
Save your files and test your movie. It should look just like last time only now the print outs are from FallingBlocks_Main's functions.
Finally, let's use it to actually change something on screen!
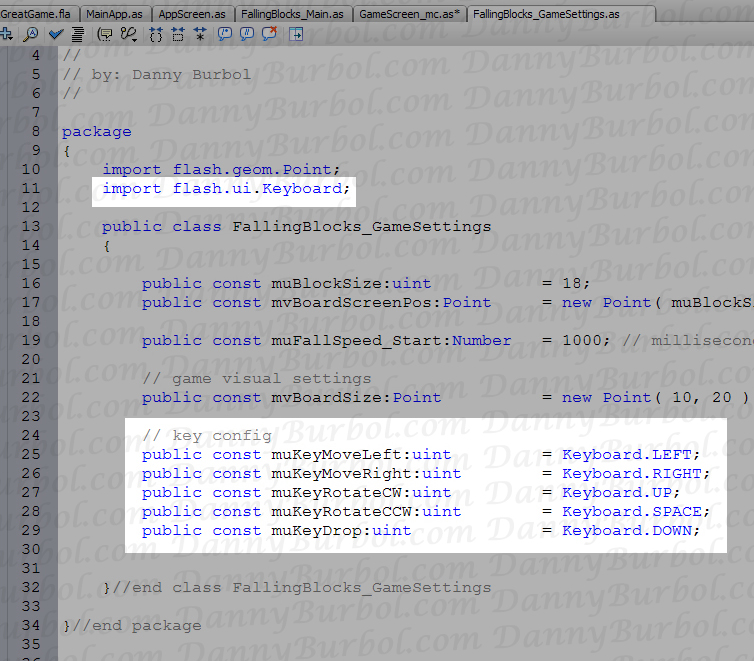
First let's define our keys in FallingBlocks_GameSettings:
Note; RotateCW stands for "Clock-wise" while RotateCCW stands for "Counter Clock-wise"
Also Note: remember my warning at the beginning about not using the SHIFT key. The first versions of my game did and I got lots of complaints. That's why we're using SPACE to RotateCCW.
Now let's hook these keys up in FallingBlocks_Main.as to actually do something. We'll move the current game piece around a block's with at a time.
So we have a switch statement based on the key that was passed in the event. Each case is a key *from our GameSettings*, NOT a direct test for things like Keyboard.LEFT. (This is so we can remap keys easily).
Then we just update the mCurPiece's x and y positions (which is just the Sprite x and y from the Sprite class we extended). Since all the blocks in the piece are children of the piece, they will automatically say relative to the pieces new location.
Save your files and test your move. You should be able to move the current piece around.
Also, note how the piece moves if you hold a key down. Flash will send the key down event repeatedly, so the piece will move once, then pause, then keep moving. Which is ideal for our falling blocks game. This is one of the reasons we didn't use one of the fancy keyboard input classes I've seen floating around the web. It would be overkill for this game and we'd have to write extra code just to get that "move once, pause, keep moving" functionality.
7. Rotating Game Pieces
As I mentioned earlier, we went through the trouble to mark the block we rotate around as (0,0) so we could use a simple vector math trick.
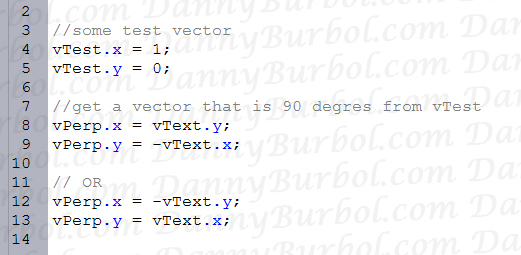
In vector math, you can find the normal to any vector by swapping the x and y values and negating one. It's a pretty common trick for anyone working with 3d games. It looks like this:
What's interesting is that the negative determines if we are going in a clockwise or counterclockwise direction from the original vector.
We're just going to use this to rotate the blocks in our piece.
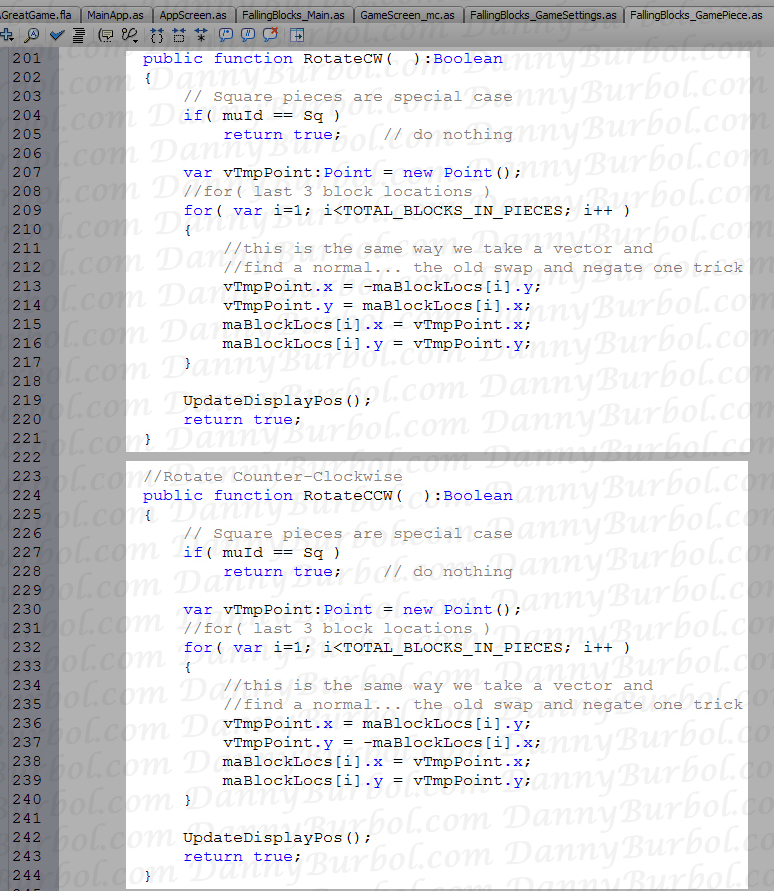
FallingBlocks_GamePiece.as:
First thing to note is that both of these functions are identical except for the negative signs on line 213 vs. 237.
The second thing to note is that I've got the function returning a Boolean. If I haven't already mentioned it (and you don't already know) a Boolean is a variable that will only ever be "true" or "false.
At the beginning of the functions we test for the special case of a Square piece. There's no need for Square pieces to rotate. We return "true" to say "rotation was successful." Because a square rotating 90 degrees around it's actual center point still looks like a square. So there's no reason to return false.
Next we loop for the 3 block locations that are not our center block. In the loop, we swap the x and y values and negate one, just like we do with vectors. I know some of you may feel the urge to optimize my code and replace "vTmpPoint" with as single "nTmpNumber"... but don't. I did that because later we're going to test our vTmpPoint to make sure the block isn't colliding with something (as in, "is the block *allowed* to rotate?").
After that, we update the blocks' display position (no need to update the colors, right?). Then we return true for "rotation was successful".
Again, I'm just planning ahead here with the returning of true. Currently, our function doesn't return false, but in later lessons it might.
Now go back to FallingBlocks_Main.as and hook these functions up to actual key presses:
Save your files and test your movie. You should be able to move and rotate your current piece.
And there you have it. The shortest section so far.
Summary
So what have we learned? We've done so much, I'm sure it's easy to forget what we did in the first section.
We have:
Learned how to draw rectangles in a Sprite.
Learned how to make a class with a static function (DrawBlock.WithBorder())
Learned how to create a GameSettings class and why we take the time to do so (because it lets us create alternate game settings without having to change our actual game)
Learned how to use Timer Events to gave a periodic event for running the game with and for one time delays.
Learned the syntax for arrays and 2d arrays.
Learned how to make a GameBoard with Cells to hold block data.
Learned how to represent Game Pieces with an array of block locations
Learned a simple way for getting keyboard input (which is a complex topic you should look into some time)
Learned how to apply a small vector concept to the rotation of game pieces.
I hope by now you've gained a lot of respect for these falling block games. These first two Lessons have been pretty long, and so far, we don't really have a game yet. However we do have all the pieces for a game. In the next lesson we're going to start putting the pieces together and writing the actual game's logic. It's going to be another long lesson, but by the end, you'll have something to play.
Also, I think most of us would refer to this kind of game as "simple" arcade game -and it is. This is a simple game to play, and a simple game to make. However, now you might be seeing how much programming is involved in a "simple" arcade game. Don't be discouraged, just know that this is a really great "my first game" to be working on. Plus, it's a framework that can be reused and tweaked. Once you finish this game, you'll be able to reuse it to make many different styles of action-puzzle games.
On top of that, you'll be able to take the next step and make a more "Pac-Man" style games. If you think about it, the 2d grid we're using for our gameboard is much like the grid we'd use to track where a character is and is not allowed to step. (The big hurdle is adding the enemies.)
For some reason, many people try to make an old-school RPG for their first game. Trust me, RPGs are NOT simple, they are HUGE and complex. I feel for you if you tried to make one before making a falling blocks game... after all, I made that same mistake myself. :)
This is a Flash tutorial for introducing some of the basics parts of ActionScript 3 that you'll need to make any Flash Game. It's presented with a goal in mind. We will be using these building blocks to set up a basic framework for making some simple games screen that we'll be able to switch between by click on buttons on the various screens.
Here's a link to my falling blocks game, it's the reason I started making this tutorial.
I've been programming console games in c/c++ for years, but Actionscript 3 is pretty new to me. So rather than gloss over everything, I plan on making a more in-depth "how to" for people who have some programming knowledge, but are new to Flash and AS3.
A work of caution to artist and non-programmers: Making game with Flash using AS3 doesn't *involve* programming, it *is* programming. This tutorial can't teach you how to program, I'm sorry, it's just a topic all to itself, and it's a huge topic at that. So use your best judgment as-to whether or not you want to go through with this tutorial, I don't want to waste your time or make you frustrated. Also, if anyone reading this had some good links for helping others learn some the the basics of programming and programming practices, please leave a comment so others can benefit. (Thanks!)
By the end of this tutorial we will have a flash application that shows a few screen and lets you click buttons to go between them. For example: a "someone presents" screen, a title screen, a credits screen, and a game screen that we can click buttons to go between.
So by the of this tutorial, you will have a framework, something like this:
Elements I'll be explaingin in this tutorial:
Make a .fla file
Make a few movie clips (one per screen)
Make a few buttons (for switching screen)
Make a .as file
Make a class
Hook flash to automatically run ActionScript
Hooking up movieclips to work like classes in ActionScript
Hooking up buttons to work like member variables of classes in ActionScript
Catch Generic Flash Events
Make and Catch Your own Events
Elements I won't be explaining:
I won't be explaining "how to program", but I will be volunteering as much insight as I can about the Actionscript I'll be showing. Regardless, if you don't know what a "class" or "event" is and you've never heard of "public", "private", "extends", or "override", please stop now. You will be disappoint about halfway through this tutorial. Instead, go check out some programming tutorials and come back to this one later.
Step 01: How to Create a new Flash .fla file:
open flash
if you're not presented with a splash screen that has the option for creating a new .fla file, then go to the "File" menu and select "New..." In the popup, highlight "Flash File (ActionScript 3.0)" and then click "OK"
this creates an "Untitled" file. So before we do anything, goto "File" > "Save As..." and save it. For this tutorial, I'm going to call it AGreatGame.fla
Step 02: How to create a few game screens with Movieclips
First of all, we've got lots of great toolbars and window. I'll give a brief description of them *as we use them*, rather than a long list of every single element of the interface. (Also, if you're looking for a long list of every item on in the interface, try the "help" menu, there's lots of element by element information in there. That's where I started.)
Let's start with the "Stage". The stage is the panel that's most likely in the center of your screen with a big blank square on it. You'll also note it has a "timeline" at the top with a "Layer 1" and below that a bar with the word "Scene 1". "Scene 1" is talking about our blank Stage, that white box we're looking at. I just wanted to warn you ahead of time, the process we're about to go through for making screens that we can click and navigate around with are all done in actionscript. So what you see right now is pretty much what you're always going to see, even when you get to the end of my "falling blocks" tutorials. "Scene1" will always be blank. So don't panic or let it bother you.
Resize your flash movie so we're all using the same dimensions. Do this by clicking on the Properties tab at the bottom of the screen. If you don't see it, try the menu bar: Window > Properties > Properties. Now click the Size button and make your movie's dimensions 550 x 400 pixels (if it's not already.)
Next we're going to make a screen in the game by making a movieclip.
Click on the "Library" tab to see the "Library" panel (or find it in the menubar: Window > Library. If something onscreen disappears, then do it again: Window > Library. Basically, you want that "Library" item to have the check next to it in the "Window" menu.
Make a new movie clip:
In Our blank Library, somewhere in the white space below "Name" and "Type", right-click and select "New Symbol..."
I'm going to make the title screen first, so I'm naming this movie clip "TitleScreen_mc". Note the "_mc" which means "movie clip". This is not required I just like to see the name of something and know instantly what it is. It's the programmer in me.
Make sure you've got "Type" set to "Movie clip".
Click OK.
Note the stage has changed. See the bar where it used to say "Scene 1" now says "Scene 1" followed by "TitleScreen_mc". That bar will always tells us our location. The last word will always be the items we are currently editing. It's just like navigating folders on your computer. That same way we can have folders in folders we can also have Moiveclips in Movieclips. So if you ever get lost, look there and it will tell you where you are and what you're currently editing.
Now, let's make a background for our screen.
In the timeline, where it says "Layer 1", double click the words "Layer 1" and rename it to "background".
Now, in the same row we just named "background", click on the first box under the "1" (the box has an empty circle in it) This box is frame 1.
Next, click on the Rectangle tool (looks like a rectangle, below the line and above the pencil)
Briefly, I'll just say, note the bottom of the toolbar you just clicked on. There is a pencil and a bucket, both with a square of color. These are going to be the border color and the interior color of the rectangle you are about to draw. So pick a couple colors you like.
Draw a rectangle on the stage. Don't worry about size, we're going to make it exact by edit the numbers after we create it.
Now got down to the Properties tab (remember, we used this to set the size of the movie.
The movie is 550 x 400, so let's make the box the same size. Set:
W: 550
H: 400
X: 0
Y: 0
Odds are, you're rectangle is in the bottom right corner of the screen and goes out of the stage window. If you hold down the Space bar, your mouse cursor will turn into a hand. As long as you hold down the space bar, you can click and drag to move around the Stage (so you'll see the scroll bars moving instead of the rectangle moving). Do this to center the rectangle on screen... or you can just use the scroll bars.
Now we'll give the screen some text
Look up at our layers in the timeline.
Right-click on the word "background" and select "Insert Layer"
Double click on the new layer's text and re-label it "desc"
If "desc" is not above "background", then click and drag the "desc" layer upward to be above "background"
Notice how the boxes under frame "1" in the timeline are different. "desc" is an empty circle, while "background" is a solid black circle. This is because the "background" layer has something on it (the rectangle), while the "desc" layer is empty.
Click on the box for frame 1 for the "desc" layer. (which has the empty circle in it)
Now select the Text Tool from the tool bar (looks like the letter "T", and is below the quill and above the line)
Note all the great stuff in the properties tab at the bottom of the screen. You can do all sorts of stuff to your font. So pick whatever you'd like, just make sure you pick a different color than your background.
Now click somewhere on your rectangle and you'll get a text box to type in. You can pull on the handles on the edges of the box to adjust the text box's size and how the text will wrap to the next line.
Give your game a title. I called mine: "Danny Burbol's Simple Game Screen Tutorial."
Play with the layers. Notice you can click and drag the "desc" layer to be below the "background" layer. Notice how you can't see the title text when it's below the "background". This is a useful thing to know. Layers are your friend. Also, if you drag the "desc" layer back to the top, you can hide it by clicking the dot under the icon of the eye. Next to they eye, is a toggle for the lock. The lock means you won't be able to select or edit anything on that layer, and the colored box isn't really that useful but it toggles between drawing the layer or just drawing the layer's outline.
Lock the "desc" and "background" layers by clicking on the dots in each layer below the lock icon. (this way we don't mess them up while we do the next step)
Next we will add some buttons for letting the player go from screen to screen. We're going to have 4 screens. This title screen, a "someone presents" screen, a credits screen, and a game screen. On this Title screen, we're going to want a button to go to the credits screen and a button to play the game. So let's do that.
Create a new layer in the timeline and call it "buttons". (remember how we added the "desc" layer? Double check the last step if you need a refresher).
Make sure to click on frame 1 of the" buttons" layer.
Now rather than making our own buttons, let's just use some of the stock buttons Flash was kind enough to share with us.
In the menu bar: "Window" > "Common Libraries" > "Buttons". This will give you the "Library-Buttons.fla panel
Find a button you like and drag from the "Library-buttons" panel to the "library" panel. (Pick a button that already had text on it.) --Note: *don't* drag it directly to the stage, drag it from one library to another.
In the "Library" panel, double click the button's text name and change it to "Play_btn". (I'm not talking about the "enter" text, I'm talking about the text name it's listed as in your "Library" for your AGreatGame.fla)
Drag a second copy of the button over to your library and name this one: "Credits_btn"
In your "Library", double click the little button icon next to the words "Credits_btn".
Notice how the button is on the stage and the location bar now reads: "Scene 1 Credits_btn"
Also notice that the timeline for buttons looks different than the movie clip did. Instead of having frame numbers across the top, there is "up", "over", "down", "hit".
Locate the layer with the button's text on it and unlock it if needed. (I like to turn the layer's visibility off and on until I'm sure I've found the layer that has the button's text on it. Note, my button's text started out as "Enter")
Once you've unlocked the layer with the button text, double click the button text on the stage to edit it to say "Credits".
Now go back to your "Library" panel, double click the button icon for "Play_btn" and change this button's text to "Play" (refer to the steps above if you need a review on how to do that.)
The two buttons are ready to put in on your title screen. Go back to the "TitleScreen_mc" by double clicking on the little movie clip icon next to the "TitleScreen" text in the "library"
With the TitleScreen_mc on the stage, and the first frame of the "buttons" layer selected, drag a copy of "Credits_btn" and "Play_btn" from the Library panel to the stage.
Finally, we have all the elements for this screen. To keep our Library from getting too cluttered, you can right-click in the Library and select "New Folder". I named my folder "fTitleScreen". Again, I like names that say what they are. In this case, the "f" means "folder"... but at the same time, Flash doesn't like it when two things in the library have the same name. The first time I did this, I name my Title Screen movie clip, "TitleScreen"... and then when I tried to make a folder called "TitleScreen", Flash wouldn't let me. So by getting into the habit of post-fixing and pre-fixing names, I avoid any problems like this.
Now, go back to the beginning of these steps and create a few more screens with a few more buttons. When you're done you should have:
IntroScreen_mc
Some text that says: "Presented by " or "A Production"
A button named "SkipIntro_btn" that says "Skip Intro" on it.
CreditsScreen_mc
Some text that says: "Credits"
Some more text that says: "This game was made by "
Some more text that says: "Special thanks to the totally helpful flash tutorial on DannyBurbol.com" (well, it'd be nice of you to do that).
A button named "BackToTitle_btn" that says "Back"
GameScreen_mc
Some text that says: "the game will be played on this screen"
A button named "Quit_btn" that says "Quit" on it.
After you've create all of these screen, you should put them in 4 folders in your library, "fTitleScreen", "fInfroScreen", "fCreditsScreen", "fGameScreen"
TIP: if you make a mistake and put all of your screen's elements on the same layer, you can fix it by clicking on the frame in the timeline (the box with the black dot in it) and then right-clicking on one of the highlighted items on the stage and selecting: "Distribute to Layers". Now each item is on it's own layer... just rename the layers to match what's on them... again, you can use the toggle of the eye to turn layers on and off and make sure you know what's on each layer before you rename it.
Step 03: How to make and hookup a Document class
If we test our game right now, we should get a blank screen. You can test your game by pressing Ctrl+Enter, or going to the menu bar and selecting "Control" > "Test Movie". (PS, if you have a Mac, I'm sure you're used to figuring out what the Mac equivalents of PC shortcut keys are... in fact, I've been saying "right-click" a lot, and I know that's different for you guys as well. I'm just going to continue in PC terms, please keep translating in your mind like you have been already. Thanks, and sorry for the inconvenience.)
So, what we want to do is use ActionScript to create an object of type "movie clip" (all of our screens are movie clips). Then we want to show the movie clip we created the in movie's main scene. Of course the question is, "how?"
We have a couple things to overcome.
We need to get the movie to trigger some ActionScript the moment it starts playing.
Then we need that ActionScript to specifically create one of our movie clip screens.
Finally, we need to get that movie clip to actually display.
This section is going to cover that first issue: get the moive to trigger some ActionScript the moment it starts playing.
First we need an ActionScript file to call when the movies starts, so let's create an ActionScript file.
in the menubar, select: "File" > "New..." and then select "ActionScript File". Don't select "Flash File (ActionScript 3.0)". I know that one looks tempting, but it's going to create another *.fla file.... what we want is a *.as file.
Our main window changes and we no longer have our stage and timeline. Instead we have a blank screen with two tabs at the top "AGreatGame.fla" and "Script-1".
Before we get distracted, let's name the *.as file. Please note, I had a bit of a run around when my *.as file and the class it contained were not named identically. It could have been a fluke, but I just got in the habit of making sure my names were identical. So just give some thought to your file names is all I'm saying.
Let's "save as" on this file and call it, "MainApp.as" and be sure to save it in the same directory as AGreatGame.fla. (don't call it by the name of your game, you'll regret it later in the tutorial when we actually create an AS file by that name)
Now we type in some ActionScript. Notice I said "type". I don't mean to be a pain in the butt or sound all "holier-than-thou", but copy/pasting stuff is not going to get you anywhere. I heard a great quote: "The Learning is in The Doing". Very wise in my opinion. You learn more by "writing script" than "moving script" from one screen to another with copy/paste. (sorry for the lecture).
Save Your MainApp.as file! I don't know why but Flash doesn't automatically save your *.as file when you try to test your movie (as in: ctrl+enter). So just get in the habit of saving often. Also, if you change some script and run your movie only to see that nothing happened, you'll remember my mystical jedi powers of suggestion and recall this paragraph *before* you pull your hair out.
Okay, so what does this script mean? With my one week of AS3 experience I can tell you this:
All *.as files that I've seen start with "package"
All *.as files that I've seen have no class or one class in them, but I haven't seen more than one class and I hadn't had a reason to try it.
import is a lot like C++'s #include or using namespace.
trace( ) is basically our debug printf.
But wait! What's a "class"? what's "public"? what's "extends"? -if you find yourself asking these questions, then you need to take a break from this tutorial and go check out some object oriented programming tutorials. I don't mean to be rude but classes are a basic programming building block these days, and the syntax of ActionScript is very much like Java and C++. So you should read up on them. In all honesty, it broke my heart when I realized just how much programming is involved in ActionScript. I had visions of little kids on Christmas morning, opening their gifts to find that one perfect toy they've been waiting months to play with, only to find out it didn't come with batteries. I really thought Flash with AS3 was going to pretty much be a fun little "game editor" or something... but the reality is, Flash and AS3 are so powerful because they are so much like programming. If you want to make cool games, just bite the bullet and start reading (and doing!) programming tutorials. This is tough love. I'm warning you now because it's only going to get more complex as we move on.
Okay, we have the bare minimum ActionScript to do something, which is just a debug print in our class' constructor. Now we need this class to actually get created when the movie runs. This is why the title of this section is "How to make and hookup a Document class."
If you haven't already, save your MainApp.as file.
click on the tab at the top of the window to go back to your AGreatGame.fla file (you can also use ctrl+tab).
in the location bar, click on "Scene 1" to verify that only the words "Scene 1" appear in the location bar.
Click on the blank stage and then click on the Properties tab.
Remember, this is where we set the movie's size.
Also in this panel, you'll see "Document class". This is where we tell flash the name of the class we want to create when the movie starts running. So type in: MainApp
now hit ctrl+enter to test the movie. The Output window should automatically open and print "MainApp::MainApp()".
tada, this is basically "hello world", only more useful because we've also created an instance of a class.
Step 04: How to Link Movie Clips to ActionScript like classes.
This is really cool but not really that intuitive. I followed a tutorial that did this and didn't even pause to explain why. It came back to bite me (of course), so I'm devoting a whole section to it to say:
"HEY YOU! STOP SKIMMING AND READ THIS!! It's really important and easily overlooked."
Imagine you could treat a Flash movie clip like a class in Actionscript. Imagine you could create buttons in that movie clip and have them be member variable of that class in Actionscript. That's exactly what we're going to do.
Exposing your movie clips to ActionsScript 3.0 as classes.
In your AGreatGame.fla, go to your Library and right-click your IntroScreen_mc and select "Linkage" (which is right under "Properties")
In the pop-up, check "Export for ActionScript". The data should automatically fill in.
Basically, we're about to say we want a class called "IntroScreen_mc" and we want it to extent "flash.display.MovieClip" which makes sense. Our IntroScreen_mc *is* a Movie Clip and we want to add more functionality to it. Also, the "export in first frame" checkbox should be check.
Now here's one of my first "sad kid with no batteries on Christmas" moments. We click OK and nothing happens. I really expected flash to create a new ActionScript file for us and pop in the one class so we would have not change of screwing it up. This is not the case. You need to *already know* what the class is supposed to look like in *their language*. This, I think, is a lot to ask of any user regardless of one's programming experience. I paid money for this "tool", it should be saving me from cases of potential user error. Oops.
create a new ActsionScript file (remember how we made MainApp.as? go review if you have to.), call this new file "IntroScreen_mc.as".
Here's the code for this file:
Code details:
so again we start our file with "package".
We import the MovieClip, which is just like a c++ #include. If we didn't' include the MovieClip, on the next line, Flash would give us a compile error for trying to used an undefined type "MovieClip".
Our class definition is pretty straight forward. You may think it looks a little funny having that "_mc" hanging off the end of the class name. Again, I did this to help ourselves in the future. We're going to make class that are *not* attached to Flash objects with this "Linkage" property. So it's nice to have that "_mc" jump out at you to tell you which things are relying on things in your flash library and which are not. Think about it, if I handed you 100 *.as files and 20 of them ended with "_mc.as", you'd instantly have a much better understanding of what files do what and which are linked to objects in the game's flash library.
Again we put a trace in our constructor because we want to verify that it worked.
go back to MainApp.as and add a few things.
Remember, we have to import the MovieClip so we can use it.
We create a member variable to hold our current screen. Note how AS3 does this. You declare public/private for the variable, then you use "var" to say it's a variable. This is followed by the name of the variable, then the colon and the variable type. Also note that this is a pointer because we just set it to null (a lowercase "null" btw). Why do we have a "var" if it's obviously a MovieClip variable? Later you'll see us replace "var" with things like "const". So it's good to see AS3 allows us to describe our data as "var", "const" and "static".
We created a function CreateIntroScreen() which will do just that.
add/removeChild() are for adding the screen's movieclip to the MainApp, which is, in turn, a child of the stage. These functions control whether or not the screen movieclip will be displayed in our flash movie.
I started with an error check, better safe than sorry.
Note, no 'delete' because we're using a garbage collecting language.
and "new" is just like C++.
Finally, we call CreateIntroScreen(); in our MainApp's conctructor.
Save your *.as files. Then test it with ctrl+enter.
Finally! We have visual! (notd, the button does nothing) I hate not seeing my game onscreen and it's a shame just how much we have to go through to get to this point. Are their other ways? Yes, of course, but I fell victim to many of those ways when I first starting researching AS3 with the goal of making a falling blocks game. Let me repeat: there *are* easier ways to get something on screen, but I found many of those ways quickly limit us as to where we can go next. This way, we have class, we have encapsulations, --we have all the structure in place to actually start programming an application/game. Again, I use the word "programming", I'm sorry my artist friends, but Flash really did go into the realm of programming on this one. If you're an artist and you want to make a Flash game, you might be happier hooking up with a programmer so they can do what they love (type boring text!) and you can do what you love (make things look awesome!)
btw: you're output window should read:
MainApp::MainApp()
IntroScreen_mc::IntroScreen_mc()
okay, just a note on how I work. I'm a visual person. From here on out I'm going to add a little bit, and then test the movie, and add a little bit, and then test the movie. I'm not going to dump a couple files worth of ActionScript on you and say "1. type all this. 2. 'tada' we're done." We're going to build on what we have and keep building.
BEFORE YOU RUN AHEAD AND IMPLEMENT THE OTHER SCREENS (ie: CreateCreditsScreen(), CreateGameScreen() and CreateTitleScreen() ), first take this next step.
The plan here is to have MainApp manage our screens. The best way to do that is to give MainApp a common API for dealing with all of our screens. Currently mCurrentScreen is a MovieClip, which is nice. Those add/removeChild() functions will work for all of our screens. However, we're going to plan ahead so our screens' common API can get more complex as we progress.
To do this we're going to insert a class between IntroScreen_mc and MovieClip. We'll call this new class "AppScreen". And in the end, all of our screen movieclips will inherit from AppScreen.
So create a new *.as file and name it AppScreen, then fill it with this:
now update what IntroScreen_mc extents from MovieClip to AppScreen.
Also update MainApp.as so our mCurrentScreen is no longer of type MovieClip and instead, of type AppScreen.
save your files and test your movie. It should look exactly the same, only you should have different output text:
MainApp::MainApp()
AppScreen::AppScreen()
IntroScreen_mc::IntroScreen_mc()
Now go back to the beginning of this section and use your copy/paste skills to:
Link up each screen using the "Linkage" properties.
Create files with classes for: CreditsScreen_mc, GameScreen_mc, and TitleScreen_ms.
Don't forget, your screens are extending AppScreen, not MovieClip.
Create functions in the MainApp class for: CreateCreditsScreen(), CreateGameScreen(), and CreateTitleScreen().
Test those functions by trying each of them in your MainApp::MainApp().
Step 05: How to access Buttons in ActionScript classes.
We're going to do two major things in this section. First we're going to give ActionsScript access to the buttons on each screen. Then we are going to actually listen for when the button gets pressed and give a debug print. We're not actually changing screens just yet, we're just hooking up buttons.
Before we do anything, we need to verify you don't have the "mess everything" checkbox checked in your settings.
Go to File > Publish Settings...
Click the "Flash" tab
Where it says: "ActionScript version: ActionScript 3.0" and then "Settings..."... click that "Settings..." button.
Make sure "Stage: [ ] Automatically declare stage instances" is not checked. We're going to declare our instances in each screen's class, if we don't uncheck this, Flash will complain that we're trying to declare something twice.
Click OK, but don't close the Publish Settings window.
While were here, check the "Protect from import" box and anything else you might find useful.
Click OK to close the Publish Settings window.
now let's hookup a button to our actionscript. We'll start with the IntroScreen_mc, since that's the first screen with the first button we can test with.
Double click the icon next to "IntroScreen_mc" in your Library. (so you can get to the edit mode for IntroScreen_mc.
You may need to center the screen in the stage, remember you can do this by holding down the spacebar while clicking and dragging, or you can just move the scroll bars.
Select the Selection tool from the toolbox. (the black pointer at the top of the toolbox)
Single click on the "skip intro" button on the stage to highlight it.
Now, if it's not already open, click on the "Properties" tab at the bottom of the screen.
There should be some gray'ed-out text that reads: . Change that to be: mInstBtnSkipIntro
Again, we have my extra descriptive prefix. I'm sure your getting tired of them, but let me explain my logic. "m" is about to mean "member variable", "Inst" is "instance", "Btn" is "button". I put all this *before* the SkipIntro because this is going to be a *variable*, while "SkipIntro_btn" is a *type*. This way when you see "mInstSomething" vs "Something_btn" in Actionscript, you'll not right away if it's a variable or if it's something in your flash movie's library that you can edit. Imagine if they were both called "SkipIntro" and "SkipIntro"... it just leads to a runaround if you don't already know what you're looking at.
After naming the instance, open up your IntroScreen_mc.as
Add the following lines:
We have to import SimpleButton and MouseEvent because we're about to make SimpleButton variable and listen for mouse events on that button.
public var mInstBtnSkipIntro:SimpleButton; is that same instance we just named in our IntroScreen_mc. Note: "public" not "private", Flash doesn't like it when these types of vars are "private".
mInstBtnSkipIntro.addEventListener function is Flash's standard way of listening for events. (as in: remember this line, you'll be making lots of these in the future).
MouseEvent.CLICK is the event we're listening for.
OnSkipIntro is the name of the callback function we want flash to call when the MouseEvent.CLICK event is fired.
false, 0, true : this sets out "useCapture", "priority", and "useWeakReference". We want our game to be fast and not use a lot of memory for events. These settings let us do that.
The OnSkipIntro function is the function that will be called when our button is clicked... we could have called it anything, it's the ev:MouseEvent that's the required part.
Save your file and test your movie. You should get a printout every time you click the "skip intro" button.
Now go back the hook up all your buttons in all your movieclip screens.
Be sure to test them all to make sure they are printing out the debug trace correctly before moving on to the next major step. So you should have the following button instance variable and callback functions:
In CreditsScreen_mc:
mInstBtnBack which is hooked up to call an OnBack function.
In TitleScreen_mc:
mInstBtnPlay which is hooked up to call an OnPlay function.
mInstBtnCredits which is hooked up to call an OnCredits function.
In GameScreen_mc:
mInstBtnQuit which is hooked up to call an OnQuit function.
Step 06: How to Sent And Receive our own custom Flash Events.
Okay, so we know our buttons are doing something because they are doing a debug print. Now we just need our buttons to actually change screens. Basically, we need a way for our AppScreens to communicate with our MainApp.
Events are pretty much the standard for objects to communicate with each other these days, and ActionScript 3 is no exception. We've already used one of Flash's standard events to listen for buttons being click. This was when we told each button to "addEventListener" and then specified a function to call when the event was fired.
You can get pretty far using nothing but Flash's built in events. In fact, rather than have each screen be in charge of listening for it's own buttons (like we just did), I saw plenty of sample code that would have our MainApp class access each specific button in each specific screen and attach a listener function there to handle each button press. This works, but it also breaks the simple idea of encapsulation. Each screen should be self-sustaining, and if we change the buttons on a screen, it seems silly that we would have to also fix references to that button *outside* of the screen's class (as in, the bad MainApp usage I just described).
So we're just going to bite the bullet and learn how to setup our AppScreens to send and receive our own custom events. Now, instead of having MainApp setup to say "tell me when someone clicks this exact button in this exact screen", we're going to set it up to tell MainApp, "hey, don't ask why, but someone wants to go to this other screen." That way all the logic of what the buttons do is encapsulated in each screen and MainApp never has to know about what screen has which buttons on it.
So lets get started adding our own events:
First we need to define our events so we can send them later. An example of an event would be that "MouseEvent.CLICK" we used earlier.
Create a new *.as file, and save it as "AppScreenEvents.as"
Here's the code for that file:
Again, package comes first and everything goes inside it.
Our AppScreenEvent class extends Event
These next four static const strings are out events. That are the equivalent of that "MouseEvent.CLICK", however we will be using something that looks like "AppScreenEvent.GOTO_TITLESCREEN"
The constructor is just passing on the data to it's super class (Event). This 'super' keyword is awesome in my opinion (having dealt with the way C++ calls super class functions, which involves hard coding the name of the super class followed by the scope operator.)
We also override the clone function. BTW, this is the first time we a colon after the function's closing paranthisis. "clone():Event". This is how we define a funtion's return type in ActionScript 3. So it's consistent with the way they define variable types, and it's carried out with the "return" keyword as expected.
Save your files and Test your movie, just to make sure all the was typed correctly and didn't cause any problems.
We have our events, now we need to be able to sent these events.
Open IntroScreen_mc.as
Update the OnSkipIntro function as follows:
Pretty simple. The OnSkipIntro function gets called when the "Skip Intro" button is press on the Intro Screen. What do what want to happen when went we press this button? We want to go to the Title Screen. So we create an AppScreenEvent using the GOTO_TITLESCREEN static const we just setup.
Now open each *Screen_mc.as file and add the dispatchEvent call after our button's trace output. Just ask yourself "where do I want this button to take me?" and then changed the "GOTO_xxx" to match.
Save your files and Test your movie, again just so make sure we didn't make an typos or anything. The movie itself is not going to do anything new just yet.
Now, we have custom events that we're sending out when buttons are clicked, we just don't have anyone listening to these events. We do this pretty much the same way we did our "MouseEvent.CLICK". That is, we're going to use the "addEventListener" function again.
In MainApp.as add this function:
So basically when mCurrentScreen fires off one of our "GOTO_xxx" events, we go to one of our Create*Screen functions.
This doesn't compile yet, by the way. Remember, an event callback takes a parameter that is the event it heard. Back in IntroScreen_mc.as, we have the OnSkipIntro function that takes the parameter "ev:MouseEvent", because that's what it's listening to, a MouseEvent. We need to make our Create*Screen functions aware of the event they are catching.
So, in MainApp.as, for each of our Create*Screen functions, change the parameters from "( )" to "( ev:AppScreenEvent )". Also, while you're in there, have each of these functions call AddListenersForAppScreenEvents() on the last line of the function.
Note, you're changing more than want I got in that screen shot
The very last step is to go back to the MainApp constructor and have CreateIntroScreen pass a null parameter.
Save your files and test your movie. You should be able to click buttons and move around from screen to screen.
The Next Step: What you can do with what we've learned.
This is the end of this tutorial. What have we learned?
In the end, the most important things we're walking away with here is the ability to:
Access movie clips in ActionScript 3 as classes via the "Linkage" property.
Access instances, like buttons, in ActionScript 3 and have them be member variables in a class we've used "Linkage" on.
We can listen and react to standard events, like MouseEvent.CLICK
We can create, send, and listen for our own custom events. This is huge. All the other things I just mentioned are more of a "Basics of Flash Actionscript 3", while custom events are a big step up and are more of an "Intermidiate" topic. Knowing how to do this will set you free to create some really great games in the future, even if you don't follow all my, specific, tutorials.
We've used the above building blocks to set up a bunch of Screens, each of which is smart enough to manage it's own content. We've also setup a manager to switch from screen to screen when asked to do so by the objects it's in charge of. From here you could make as many screens as you wanted and link them with buttons how ever you wanted. Notice that the way we put things together, all you have to do is add a button to a screen and you can make it bring us to any other existing screen without having to touch MainApp or AppScreenEvent again.
However, if you want to add more screens, then you'll have to make sure MainApp knows how to create it as well as add a new AppScreenEvent so MainApp can communicate with it's AppScreens about going to this new screen.
If you were inspired, you could use this framework to make 100 screens and link them together to make a graphical "choose your own adventure" style story.
You can also go back and make your screens look cooler. We just did the bare minimum as far as graphics go. Now is your change to go wild. However, one word of caution: make sure your WhateverScreen_mc movieclip has one, and only one, frame. I'm talking about CreditsScreen_mc, GameScreen_mc, etc. Originally, I thought it would be cool have an animating title screen where the words animate into view. You can do this, but instead of adding a bunch of frames to your TitleScreen_mc, make a seperate TitleText_mc that had multiple frames and animates the text the way you want. Then just drag that TitleText_mc into your TitleScreen_mc's single frame. It will animate as you want, and will keep you from having odd problems to deal with later in these tutorials.
The Next Lessons: more tutorials.
The next tutorial will be about drawing a square on the screen and moving it around with the keyboard.
The tutorial after that will be about using our drawing and keyboard capabilities to make the actual game board and game pieces.
The tutorial after that will be about getting the game board and the game pieces functioning together like a game. At the end of this tutorial you'll have a bare-minimum falling blocks game.
The tutorial after that will be about adding sound.
The tutorial after that will be about adding a score and some game over text.
If you read all the way to this line. I hope you got a lot out of this tutorial!