


I'm sure every instructor has their own names for these things, but here are the basic stroke techniques as I was shown them.
First off, here's a couple of examples of the techniques in the form of shrimp (or crayfish or whatever).
(note, the top one doesn't have legs because he's a super shrimp. Don't mess with the super shimp 'cause he can fly –er swim...)
The approach
--This is not a type of layered painting like oil on canvas. You will find yourself starting with the foreground and filling in the background later.
--most strokes are final. We try to get it right the first time since layering instantly becomes "wet on wet" techniques, which is a whole different animal.
How to hold and move the brush:
--We hold our arm straight out with our thumb pointing 45 degrees up ward. The brush will point straight down. We are mostly gripping between the thumb and first two fingers with the ring finger and pinky lightly touching for control.
--do not squeeze. It's a gentle, loose touch. One method of practice for getting the shape of your hand and the lightness of the grip is to hold the brush while also holding an egg in your palm. The egg should not drop or get crushed. (note, holding the brush too tightly will result in aching hands. Continuing to do so for years will result in pain.)
--from here we may tilt our arm/wrist in various ways to change the angle in which the brush's tip touches the paper.
--Chinese *Calligraphy* uses a lot of wrist movement. Chinese *Painting* uses your arm. We make nice long, smooth, strokes by moving from the shoulder, not from the wrist. However when making finer isolated details, we may use the wrist more.
--we hold the brush three quarters of the way up when drawing thick lines and three quarters of the way down for thin lines. (or basically "near" the top or "near" the bottom, not "at" the top or bottom.)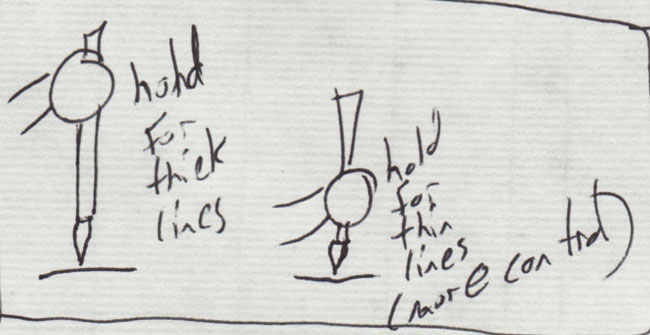
Brush angles and center brush
There are two ways to make thick and thin lines. With pressure, or by tilting the brush. When we hold the brush directly vertical (90 degrees in relation to the page), this is call "Center Brush." It will give us the thinnest lines (provided we can control our pressure).
From there we can tilt the brush and start getting thicker lines. Try 60 degrees, 40 degrees, 30 degrees and 15 degrees. (remember, when we made that nice wide gradient? The brush was at 15 degrees.)
Specifically with Center brush, we try to keep the very tip of the brush in the center of the line. But when we start tilting the brush for thicker lines, we keep the tip on one side of the line and move the brush to the side.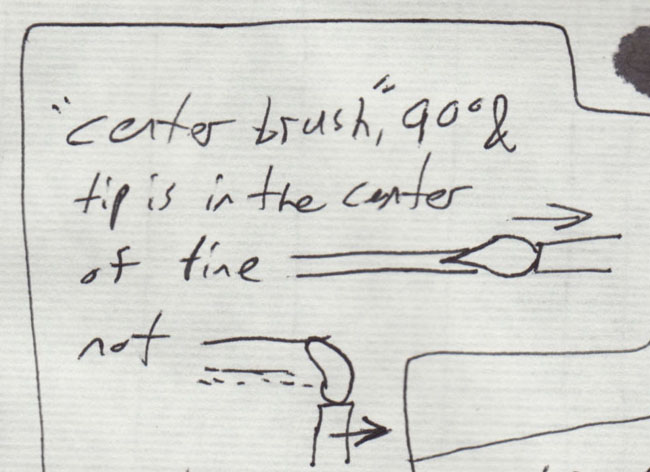
Center brush is good for changing directions because the tip of the brush will trail along behind you and point in the direction of the line you're leaving behind. However, it's much harder to change directions when you're tilting the brush at an angle.
For example, the shrimps whiskers were made with center brush, while the sections of the body were made by tilting the brush less and less with each dab.
strokes vs marks
Most strokes have a definite start and end point, this gives the stroke a bone shape (like the shrimp's arms). A mark is just a mark on the page. It has no start or end and will often feel more random and unintentional. Most times, a stroke with one or two endpoints will look better than a mark.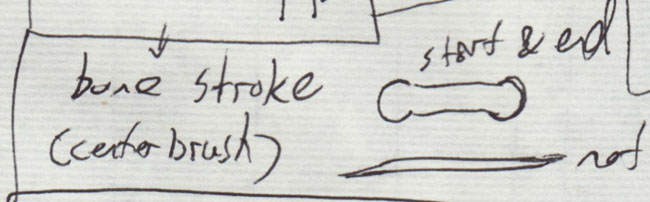
Don't fight the endpoints, embrace them. Realize that in nature things sprint from other places. Grass has a wider start point at the base, so do tree branches. Even a knot on a tree will not be perfectly round, it will have a direction it was drown from (so it looks like a dab of a brush, not a dot)
pulling stroke
a pulling stroke is a thin line with a start and end point that may change direction. So it has that bone shape and it's done in center brush.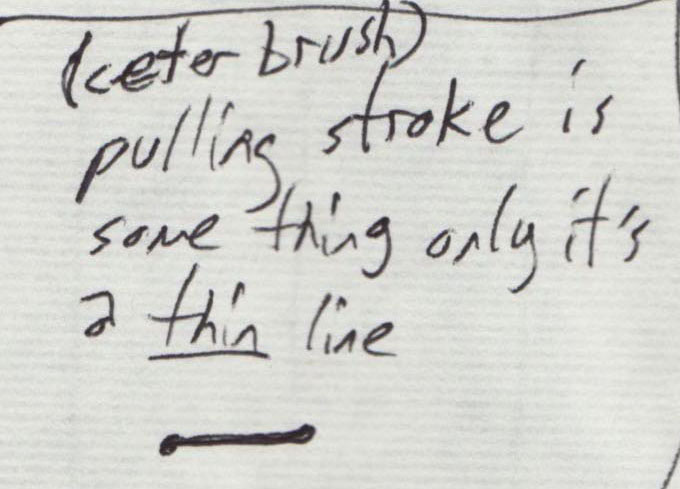
pointing stroke
a pointing stoke is a thin line with a start point but no end point. They are made using a hard bristle brush in center brush position.
The shrimp's whiskers are pointing strokes.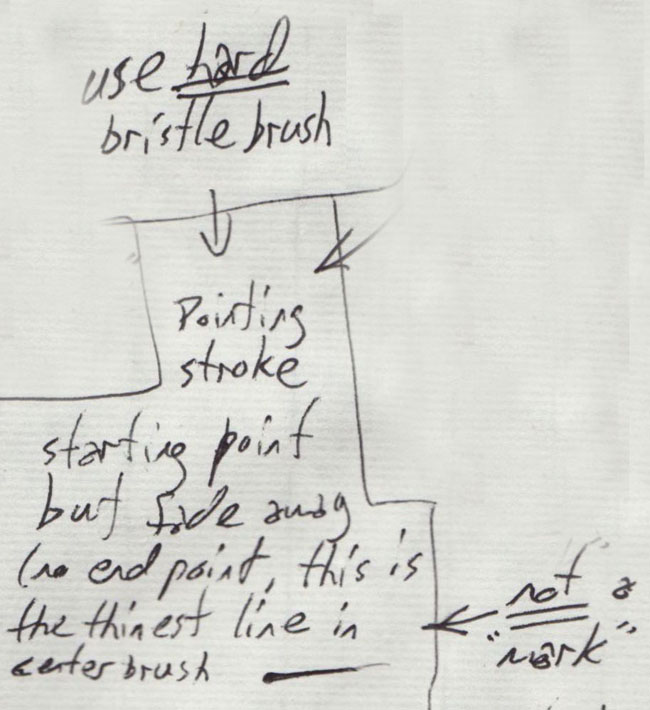
Reshaping your brush tip
Before making a stroke, look at the very tip of your brush. Is it perfectly pointy and straight? If not, fix it before making the stroke. Do this by touching it to an empty chamber in your pallet and rolling a little. Don't use the dabbing cloth because that will pull ink out of the brush. Strokes will always look better if the tip is reshaped before you use it, so get in the habit.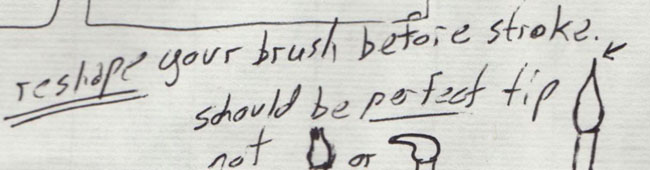
Finally, here are those crayfish/shrimp again so you can get another look at how the strokes come together.
Monday, January 28, 2008
Chinese Brush: Types Of Strokes


 Labels:
ChineseBrush,
Technique
Labels:
ChineseBrush,
Technique
Subscribe to:
Post Comments (Atom)


2 comments:
BTW, the super shrimp is also blind. (oops)
Post a Comment