


"Remember, there are no rules, just tools." ~Glen Vilppu
If you're anything like me, you don't have a lot of time to begin with, so the little time you have to sketch or make art is very valuable. At the same time making art is all about spending as much time as you need to "finish" the piece. A buzz word in game development right now is "iteration time." The more times you iterate on something, the better it can be in the end. If it takes 10 to 20 iterations before something is just the way you like it, wouldn't you want to iterate as fast and clean as possible? Wouldn't you want to safely experiment for a few iterations without ruining all the work you've do so far (like destroying your original)?
Enter this technique, which I'm calling "Virtual Tracing Paper." Traditionally, one of the first things you learn is to sketch very very VERY lightly with a lighter pencil. Then you make iterations by very slowly moving to a darker pencil and finally to ink. I'm bad at this, I'm too heavy handed (and I do still practice this BTW, so I am getting better). That leads us to the next traditional technique of tracing paper and/or light-boxes. If you make all your iterations on a new sheet of paper, then a world of possibilities open up for the direction you can take the piece you're working on.
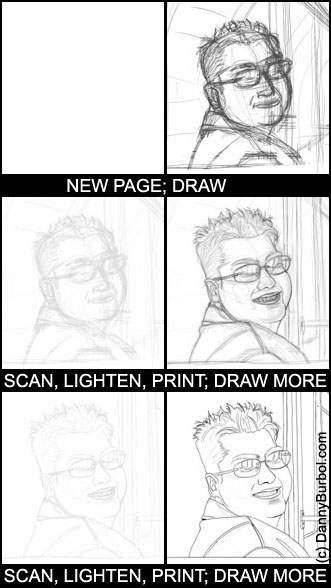
Virtual Tracing Paper is the idea of leveraging the computer as if it were a light-box. It requires a scanner and a printer. Basically scan in the image you're working on, lighten it up, and print it back out. Continue to work on the printout.
Advantages:
- you can re-size/rotate things.
for example: take a small doodle and grow it to be the size of the page for the next iteration, or grow one detail to the size of the page so you can work on all the little hard to reach areas. If you have a sketch that's to tall or two wide, you can squash or stretch it. If you draw at an angle, you can tilt it to be more upright. - you can move things.
think "proportions." it's always easy to look at a drawing and say "crap, that's too long," or too short or too far apart, etc. But it's a pain in the but to do something about it. In many cases it's faster to just start over than to try to "save" the sketch. However if you scan it in and print it out you can move or re-size parts of the sketch to achieve the proportions you wanted. It will look bad because parts won't line up, but as soon as you lighten the sketch and print it back out, you can use everything as guides to draw new, better lines. - flip it!
it's a common trick to hold a piece of paper up to the light and look at it through the back side. You see everything in reverse so it helps your brain spot problem areas. Now you can just mirror the sketch and print it out and keep working. - experiments and shading.
print out 5 copies of your line-work, shade each one differently. Suddenly you can experiment without worrying about messing up the original.
The Next Level
If you want to bring the technique to a 2.0, get a tablet. If you have a tablet you can skip the printing out part and just alpha out your current layer, create a new layer, and go to town on it. Iterations become extremely easy.
A word of caution.
This can be a fun and fast way to work and experiment, however it can also be one hell of a crutch. As soon as you can move, rotate, re-size, and stretch your sketch, you start making a habit of not getting your proportions right the first time. So don't stop drawing on paper and don't stop trying to make traditional pieces the traditional way. Remember, you'll learn more if you start a piece over from scratch to fix and proportions than if you just use the computer to fix the proportions. If you want to get better, you've got to bite the bullet and do the practice work involved with getting better. In the end, use your best judgment for what your personal goals are.


No comments:
Post a Comment